Saturday, April 30, 2011

Creamy Herb Scalloped Potatoes


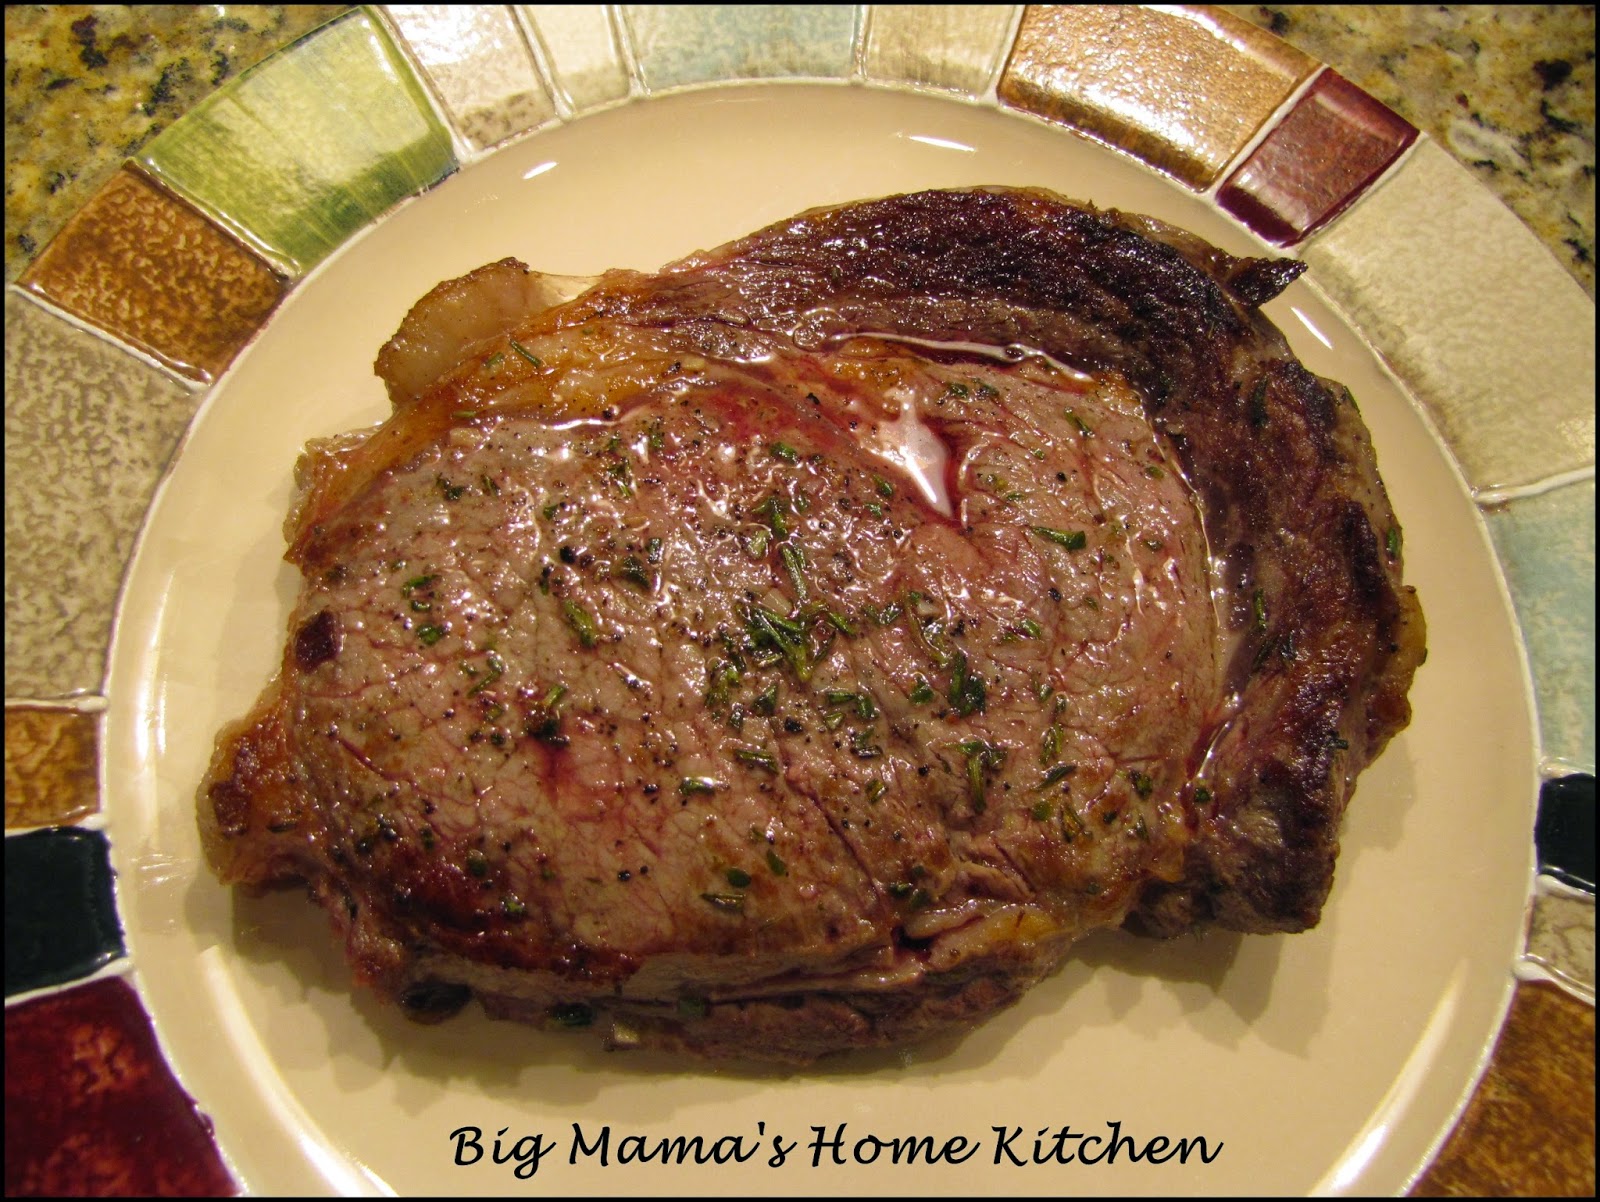
I served these amazingly creamy and flavorful herb scalloped potatoes with our olive oil~herb marinated rib eye steaks.  I found these cute little individual serving size dishes at Garden Ridge, and couldn't wait to use them.  They remind me of the dishes the fancy steak restaurants use for their sides.  I used the herbs from my garden, which includes rosemary, thyme, and oregano.  

Ingredients:

4 cups thinly sliced peeled potatoes
3 T unsalted butter
2 cloves garlic, minced
3 T all purpose flour
2 cups half 'n half
1 tsp rosemary, minced 
1 tsp oregano, chopped
1 tsp thyme, chopped 
1 tsp kosher salt
1/2 tsp black pepper
dash cayenne pepper (optional)
2 cups grated cheddar cheese blend (reserve 1/2 cup for top)

Preheat oven to 350 degrees.  Spray a casserole dish with non-stick cooking spray.

In a medium sauce pan over medium low heat, melt butter and cook garlic for 1 minute.  Add the flour and cook another minute.  Add the half 'n half and all spices.  Cook until slightly thickened, stirring occasionally.  Reduce heat to low and stir in 1 1/2 cups of the cheese.  Taste and adjust seasonings.

Layer half of the potatoes in the greased casserole dish.  Pour half of the cheese sauce over potatoes.  Layer the remaining potatoes, and pour over remaining cheese sauce.  Sprinkle remaining 1/2 cup cheese sauce over top.  Add additional fresh herbs, if desired.


Bake uncovered for 50-60 minutes, or until potatoes are fork tender and cheese is light golden brown.  Let cool slightly before serving.  Enjoy!

Friday, April 29, 2011

Olive Oil~Herb Marinated Rib Eye Steaks


This is the perfect steak for a stay-date-night.  We have lots of these nights, and always include our girls.  I have been using my fresh herbs from the garden on steaks, potatoes, chicken, and shrimp.  They add so much flavor to any dish. 

I served these juicy steaks with creamy herb scalloped potatoes and tossed salad.  This is more of a method than a recipe.  The steaks are marinated in extra virgin olive oil, fresh herbs, and spices.  Then are seared in a screaming hot cast iron skillet and finished off in the oven. 

Ingredients:

Boneless Rib Eye steaks
Extra virgin olive oil
fresh rosemary, chopped
fresh oregano, chopped
fresh thyme, chopped
kosher salt
black pepper
garlic, minced

Place steaks in a deep casserole dish.  Drizzle generously with olive oil.  Add chopped herbs, spices, and garlic.  Turn steaks over and get marinade all over.  Cover with plastic wrap and refrigerate for 2 hours.  Turn steaks over and let marinade in the refrigerator for another 2 hours.   


Remove steaks from fridge and let them come to room temperature.  Preheat oven to 450 degrees.  On the stove top, heat up a large cast iron skillet over high heat.  Add some olive oil, then add steaks to the pan.  Let sear for 5 minutes on the first side.  Turn over and let sear 3 minutes.  Turn off heat and place skillet in the oven. 

Cook until done to your liking.  I cooked ours in the oven for about 5 more minutes for medium-rare.  Remove steaks from skillet to a cutting board and let rest for at least 5 minutes to let the juices redistribute.  Slice and serve.  Enjoy!  

Thursday, April 28, 2011

Mini Banana Bread Loaves


I splurged on a new kitchen gadget for myself last week...a mini loaf pan.  I just love anything in individual serving size form.  Banana bread was obviously the first thing I planned to make.  I combined my recipe for banana bread and banana muffins to come up with this recipe.  They were moist and delicious, and my family loved them!

Ingredients:

3 bananas, smashed
1 banana, diced
1/2 cup granulated sugar
1/2 cup brown sugar
1 1/2 sticks unsalted butter, melted and cooled
2 eggs
1 tsp vanilla extract
2 cups all purpose flour
1 1/2 tsp baking soda
1/4 tsp salt
1 tsp cinnamon

Preheat oven to 350 degrees.  Spray a mini loaf pan with non-stick cooking spray.

In a large stand mixer bowl, beat together the smashed bananas, granulated sugar, and brown sugar.  Add the melted butter and mix well.  Add the eggs and vanilla extract and mix.  Sift the flour, baking soda, salt, and cinnamon into the wet ingredients.  Turn mixer on just to combine. Carefully stir in the remaining diced banana with spoon or spatula.

Pour mini muffin loaves 3/4 of the way full into prepared pan.  You will have a little batter leftover.  I made a jumbo banana muffin also!  Bake for 28-32 minutes, or until tester comes out clean.  Enjoy!


Wednesday, April 27, 2011

Mexican Shrimp Cocktail Delights


I made these Mexican Shrimp Cocktails as an appetizer this Easter weekend.  The flavors all worked well together and tasted even better when refrigerated at least 4 hours before serving.  I found this recipe in my Eating Well-May/June 2011 issue.

Ingredients:

1 pound cooked small shrimp (70/90 count), tails removed
1 1/2 cups cherry tomatoes, halved
1 1/2 cups diced English cucumber
2 green onions, sliced
1 1/2 cups Spicy V8 Juice
2 T fresh lime juice
2 T favorite picante sauce
1 T worchestershire sauce
1/4 cup fresh cilantro, chopped
kosher salt
black pepper
garlic powder
Tabasco hot pepper sauce, to taste
1 large ripe avocado, diced

In a large bowl, combine shrimp, tomatoes, cucumber, onion, V8 juice, lime juice, picante, worchestershire, and cilantro.  Taste and season with salt, pepper, garlic powder, and Tabasco until perfect.  Refrigerate for 4 hours. 

When ready to serve, stir in the diced avocado.  Serve in fancy glasses (margarita, martini, cocktail, etc.) and garnish with scallions and cilantro.  Enjoy! 

Tuesday, April 26, 2011

Vanilla White Chocolate Chip Strawberry Ice Cream


I made this ice cream a few days after seeing it on Monster Mama.  My girls love white chocolate and strawberries, and the ice cream is a bonus!  I used the vanilla custard ice cream base from the recipe, then stirred in white chocolate chips and fresh strawberries during the last 10 minutes of freeze time in the ice cream maker.  I also topped it with a fresh strawberry sauce when serving.  It only lasted a day...it was that good!

Ingredients:

1 cup milk
2/3 cup sugar
dash of salt
5 large egg yolks
2 cups heavy cream
2 tsp vanilla extract
1/4 cup white chocolate chips
1 lb strawberries, hulled and chopped

In a medium sauce pan, heat the milk, sugar, and salt over medium heat until sugar is dissolved.  Place egg yolks in a glass bowl.  Whisk, then slowly stream in 1/2 cup of the warm milk mixture while constantly whisking.  This will temper your egg yolks.  Pour mixture back into sauce pan and reduce heat to low.  Stir until mixture thickens and can coat the back of your wooden spoon.  Place a fine mesh strainer over glass bowl from earlier, and pour thickened custard mixture through to remove any thickened egg.  Place bowl in the refrigerator until cooled, about 30 minutes. 

Get your ice cream machine ready.  Stir the heavy cream and vanilla extract into the cooled custard mixture.  Pour into your ice cream machine and freeze according to manufacturer's instructions.  During the last 10 minutes of freeze time, add the white chocolate chips and strawberries to ice cream.  Store in an airtight container and place in freezer to set up completely.  Enjoy!

Sunday, April 24, 2011

Happy Easter!


We spent the afternoon decorating Easter eggs...oh, what fun!  Baskets are ready for the Easter Bunny and carrots are set out for snacks.  Have a wonderful Easter weekend with your family!


My girls did an excellent job!  We tried several different techniques this year, includuing dying, rubber bands, tissue paper, crayon shavings, crayon and dye, and stickers.

Madison's Basket

Taylor's Basket

Jordyn's Basket

Crayon shavings dropped onto hot eggs so it melts

Saturday, April 23, 2011

Chocolate Covered Peanut Butter Eggs


I made these chocolate covered peanut butter eggs as a special sweet treat for Good Friday.  My girls had early release at school so it was the perfect afternoon for making these together.  I found this recipe over at EasyBaked.  My girls lost interest around the forming into egg shapes, but I continued on, and finally finished them.  I got to decorate them all fancy since my girls were playing in the other room.  They are excited about decorating their real Easter eggs tomorrow afternoon.  I dipped some in Wilton white chocolate, and the rest in Ghirardelli milk chocolate.  I'm partial to milk chocolate because they taste just like Reese's Peanut Butter Eggs, but both are rich and delicious!

Ingredients:

18 oz. jar Jif creamy peanut butter
1/2 cup butter, room temperature
1 tsp vanilla extract
3 cups powdered sugar
chocolate coating of choice (white, dark, semi-sweet, milk)
1/2 tsp shortening (helps thin and silken the melted chocolate)
sprinkles

In a large glass bowl, stir together the peanut butter, softened butter, and vanilla extract.  Add the powdered sugar and stir well to combine.

Use an egg shaped tablespoon to shape your half eggs.  Place them flat side down on a foil linked baking sheet. 


I also used this egg holder to form some of them, but the tablespoon worked much better.  You can also use your hands to form an egg shape.


Put the peanut butter eggs in the freezer for 1 hour to set up.  When they are really firm, you can melt your chocolate.  I placed the chips in a microwave safe bowl, and turned on high power in 30 second increments until melted.  Stir in the 1/2 tsp vegetable shortening.  

Work quickly to coat the tops of the eggs.  I tried several ways of doing this, and I found a fast and not so messy way.  Balance a peanut butter egg on the flat side of a butter knife, hold over the chocolate bowl, and spoon melted chocolate over top.  Tap knife on side of bowl to remove excess.  Place back on foil lined baking sheet by using another butter knife to help you slide it off.  Decorate with sprinkles, if using.  If you are going to decorate with colored white chocolate, wait for the milk chocolate to harden first.

These are best stored in the refrigerator as they melt easily, especially if using milk chocolate.  Enjoy!  Happy Easter!

Friday, April 22, 2011

Strawberry Tarts by Little Chef Taylor


My daughter Taylor checked out Cooking 123 by Rozanne Gold from the library this week.  This is an entire cookbook filled with 500 recipes containing only three ingredients.  She wanted to make the same French Apple Tarts as Madison did a few months ago.  I suggested we change it up and make Strawberry Tarts since they are in season right now.  She was so excited since it's her favorite fruit.

I thawed out the puff pastry before picking them up from school, and she got right to work when we arrived home yesterday.  She did an excellent job and I'm so thrilled my girls enjoy baking like their Mommy.  The tarts were amazing!  My girls will be surprised when they open up their snack box at school to find another sweet Strawberry Tart.

Ingredients:

1 sheet puff pastry, thawed
1 lb strawberries, hulled and sliced
1 T sugar (optional)
1/4 cup apricot jelly + 1 T water

Preheat oven to 375 degrees.  Spray a large non-stick baking sheet with cooking spray.

Sprinkle some flour on work surface and unroll puff pastry.  Roll out slightly using a floured rolling pin.  Cut the dough in half lengthwise, then into quarters to get 8 rectangles.  Transfer to baking sheet.  Use the tines of a fork to create a 1/4 inch border around each edge.


Prick the center of each dough so it doesn't puff up when baking.


Arrange strawberry slices on the center of each rectangle in an overlapping pattern, leaving the border clear.


Sprinkle each with a little sugar.  Bake for 22-25 minutes, or until edges are golden brown and slightly puffed up.

Meanwhile, heat the apricot jelly and 1 T water.  Brush each warm tart with melted jelly.  Serve warm or at room temperature.  These are great dusted with powdered sugar or drizzled with powdered sugar/vanilla glaze before serving.  Enjoy!

Monday, April 18, 2011

Super Moist Chocolate Cupcakes


Taylor wanted both chocolate cupcakes and vanilla cupcakes for her 8th birthday party.  I googled "moist chocolate cupcakes" and The Farm Chicks blog popped up.  These were the most delicious super moist cupcakes I've ever eaten.  Seriously, I could eat several of these a day.  Even my daughter Madison said they were the best ever.  The original recipe uses a vanilla buttercream.  I used my chocolate buttercream recipe to take the chocolate flavor all the way.   

I made 24 of these chocolate cupcakes, and 24 of these vanilla sweetheart cupcakes


The kids and adults loved both of them!  One of Taylor's friends said "these are delightful!"  How cute is that!  I got these cute cupcake wrappers on Etsy


Cupcake Ingredients:

1 cup sugar
1 cup brown sugar, not packed
1 3/4 cup all purpose flour
3/4 cup cocoa powder
1 1/2 tsp baking soda
1 1/2 tsp baking powder
1/2 tsp salt
2 eggs
1 cup milk
1/2 cup vegetable oil
2 tsp vanilla extract
1 cup boiling water

Preheat the oven to 350 degrees.  Line 2 cupcake pans with 24 liners.  Sift together dry ingredients into a large stand mixer bowl.  Add the eggs, milk, oil, and vanilla extract.  Beat for two minutes, scraping the sides as needed.  Add the boiling water and beat just until blended.  The batter will be watery. 

Pour the batter into a large measuring cup or bowl with a spout.  Evenly pour the batter into the cupcake liners.  Bake for 14-18 minutes, or until the center of the cupcakes spring back when touched.  Let cool in pan for 5 minutes, then remove to a wire rack to cool completely.   

Chocolate Frosting:

4 T unsalted butter, softened
4 T Crisco shortening
1 tsp vanilla extract
3 1/2 cups powdered sugar, sifted
7 tsp unsweetened cocoa powder, sifted
1/4 cup milk - approximately

In a large stand mixer bowl, beat together the butter and Crisco until creamy, about 2 minutes.  Add the vanilla and beat to combine.  Sift the powdered sugar and cocoa powder into the creamed butter mixture.  Slowly add in the milk, a little at a time, until the right consistency.  If you are piping the frosting, it needs to be thick.  Beat for 3 minutes until light and fluffy.  Pipe onto cooled cupcakes and decorate.  Enjoy!

Friday, April 15, 2011

Taylor's Birthday Party **PREVIEW**

I have been busy planning and preparing for Taylor's 8th Spa-Tacular birthday party.  The party is on Sunday afternoon, and we have 15 girls coming over to celebrate with us!  We have a Port-A-Party coming over to provide the spa experience.  Taylor and her sisters are so excited! 

I wanted to share some pictures of what I've been working on so far.  I still have more to do and will take pictures on party day of the complete decorations.  I enjoy making most decorations homemade so I can customize them to fit the theme and colors.  Taylor picked out these cute cupcake wrappers and snack wrappers on Etsy, so I bought those and used the bright pink, turquoise, and zebra print color throughout the party areas.  There will also be flowers and balloons everywhere!

We are personalizing brightly colored small canvas totes with the girls names on front in 3-D fabric paint and flower stickers.  These are their goody bags that will have a manicure set and lip gloss inside.  We are also making a pair of ribbon flip flops for the girls to take home.

Taylor wants vanilla and chocolate cupcakes with buttercream frosting, so I'm making those Saturday night.  They will look awesome in the cute cupcake wrappers.  The snack table will also have lots of candy, popcorn, Chex mix, fruit, and orange sherbet punch.

Happy Birthday to my sweet Taylor!  Her birthday is tomorrow, April 16th.

Birthday sign for living room by presents

Entry fixture tissue pom poms over snack table

Front door sign

Snack table


Cupcake stand


Spa/Facial Table Pom Poms


Wednesday, April 6, 2011

My Little Garden


My daughters gave me this above ground garden last year for Mother's Day.  My hubby had it assembled, and it's been sitting this whole time...empty and lonely.  I decided it was time to do my research and figure out what can be planted this time of year that will do well in our very hot Texas summers.  Thank you Miz. Helen for all your help!  Hubby bought all the good soil, compost, and manure stuff and got my garden ready for some transplants.  The garden is now full of a variety of tomatoes, jalapenos, cayenne peppers, sweet peppers, and banana peppers.  This is my garden during week 1.


My mom brought me some herbs for my birthday.  I decided to plant these in pretty pots next to my garden.  I have sweet thyme, oregano, and rosemary.  In the front left pot, I planted green onion seeds.  In the front right pot, I planted garlic cloves.


I noticed a couple of the plants had holes in the leaves, which probably means a bug or insect is snacking on them.  I planted some marigolds today which are supposed to keep bugs away.  They are stinky little flowers, but add some color to the garden.


It's been a full week and two of the tomato plants have little green tomatoes on them...3 tomatoes total!  I was so thrilled this afternoon when I saw them!  It absolutely made my day. 


Let me just confess that my hubby took over caring for our indoor plants years ago after I kept killing them.  Now, I'm a determined newbie gardener.  If I do well with this garden, we might till up some of our yard for a much larger garden and attempt to grow several other fruits and vegetables.  Wish me luck with this little garden first!

This little area is next to our side entry garage.  I want to put a little picket fence around the area and add a bench and small table.  I might even add some potted flowers for some color.  My kids like playing basketball, rollerskating, riding their bikes, and playing hopscotch in our driveway.  This would be the perfect area for me to sit and enjoy watching my kids have fun while sipping on some sweet iced tea. 

Tuesday, April 5, 2011

Thick and Chewy Chocolate Chip Cookies


Chocolate chip cookies are my favorite, so I'm always trying new recipes to find the absolute perfect one.  These by far exceeded my expectations.  This recipe comes from The America's Test Kitchen Family Baking Book.  This book is now on my "Wish List" since it has lots of cookie recipes and great tips.  I did add some milk chocolate chips in addition to the semisweet since that's how I roll.  You don't have to, but they add a nice sweetness to the overall flavor.

The trick to making these cookies chewy is to melt the butter, then cool it to room temperature.  The dough is easy to work with and not sticky like the normal chocolate chip cookie dough.  I make cookies often, so I finally invested in a cookie scoop.  The cookies were all the same size and cooked evenly.  My kids didn't whine over who's cookie was bigger, so that was a bonus!  These are also baked at a lower temperature and longer than other recipes.  In case you are curious, this is my new favorite chocolate chip cookie recipe!


Ingredients:

1 1/2 sticks unsalted butter, melted and cooled to room temperature
1 cup light brown sugar, packed
1/2 cup granulated sugar
1 egg
1 egg yolk
2 tsp vanilla extract
2 cups + 2 T all purpose flour
1/2 tsp baking soda
pinch of salt
1 1/2 cups Ghirardelli semisweet chocolate chips
1/2 cup Ghirardelli milk chocolate chips

Preheat oven to 325 degrees.  Line two baking sheets with parchment paper.

Melt the butter and set aside to cool to room temperature.

In a large bowl, whisk together the flour, baking soda and salt.  Set aside.

Add cooled butter to large stand mixer.  Add the brown sugar and granulated sugar and cream until smooth.  Add the eggs and vanilla and beat until combined, scraping down the sides as needed.  Reduce the mixer to low and slowly add the flour mixture, and mix just until combined.  Turn the mixer off and stir in the chocolate chips.  

Use a 2 oz. cookie scoop and place rounded dough 2 inches apart on prepared baking sheets.  You can also use your hands and roll 2 T cookie dough into balls.  The dough is smooth and not sticky at all.  

Bake for 15-18 minutes, or until edges are lightly brown and centers are still soft and puffy.  Let cookies cool on baking sheets for 10 minutes.  Remove to a wire rack to cool completely or serve warm.  Enjoy! 

Note:  This recipe made 21 large cookies.  Store in an airtight container or cookie jar.  These can be reheated in a 300 degree oven for a few minutes for that fresh out of the oven taste the next day.


Source:  The America's Test Kitchens Family Baking Book, featured on Serious Eats Recipes

Friday, April 1, 2011

Strawberry Country Cake


Strawberries are plentiful and affordable at the grocery stores and farmers markets right now.  They also happen to be our favorite fruit.  I made this Strawberry Country Cake last summer and have been looking forward to making it again.  It's like a huge family size strawberry short cake.  I like my "short cakes" like a cake instead of like a biscuit.  This cake is moist and just the right sweetness to compliment the sweet strawberries.

This recipe makes 2 cakes, and you only need 1 for this recipe.  You can either freeze the extra cake, or you can dust it with powdered sugar or drizzle a glaze over top and serve it to those in your family who don't like strawberries (my hubby!).

Cake Ingredients:

1 1/2 sticks unsalted butter, room temperature
2 cups sugar
4 eggs
3/4 cup sour cream
1/2 tsp grated lemon zest
1/2 tsp grated orange zest
1 tsp vanilla extract
2 cups all purpose flour
1/4 cup corn starch
1 tsp baking soda
1/4 tsp salt

Filling Ingredients:

1 pint heavy cream
1/2 cup powdered sugar
1 tsp vanilla extract
1 lb. strawberries, hulled and sliced

Preheat oven to 350 degrees.  Butter the bottom of two 8-inch cake pans.  Then line them with parchment paper and butter and flour the lined pans.

In a large stand mixer, cream the butter and sugar until light and fluffy.  Add the eggs one at a time, beating after each addition.  Add the sour cream, zests, and vanilla and mix well, scraping the bowl as needed.

In a separate bowl, sift together the flour, corn starch, baking soda, and salt.  Slowly add to the wet ingredients and mix just until combined and smooth.

Pour the batter evenly into the prepared cake pans and smooth the tops.  Bake for 30-40 minutes, or until toothpick in center of cake comes out clean.  Let cool in the pan for 20 minutes.  Run a knife around the edges of pans and invert cakes onto a wire rack to cool completely.

You can make the filling while the cakes cool.  In a large stand mixer, use a whisk attachment to whip the heavy cream until soft peaks form.  Add the powdered sugar and vanilla and continue to whip until firm peaks form.

Slice one of the cakes in half with a long serrated knife.  Place the bottom half onto a cake plate, spread with 1/2 of the whipped cream, and add a layer of strawberries.  Place the top half of cake onto strawberries, spread with the remaining whipped cream, and decorate with strawberries.  Dust with powdered sugar and serve.  Enjoy!


Note:  Cover leftovers with plastic wrap and store in the refrigerator.  The extra cake can be wrapped in plastic wrap, then in foil, and stored in the freezer. 

Recipe Source:  Ina Garten - Barefoot Contessa Parties!
Related Posts with Thumbnails