Showing posts with label Pies. Show all posts

Friday, November 4, 2011

Chocolate Icebox Pie


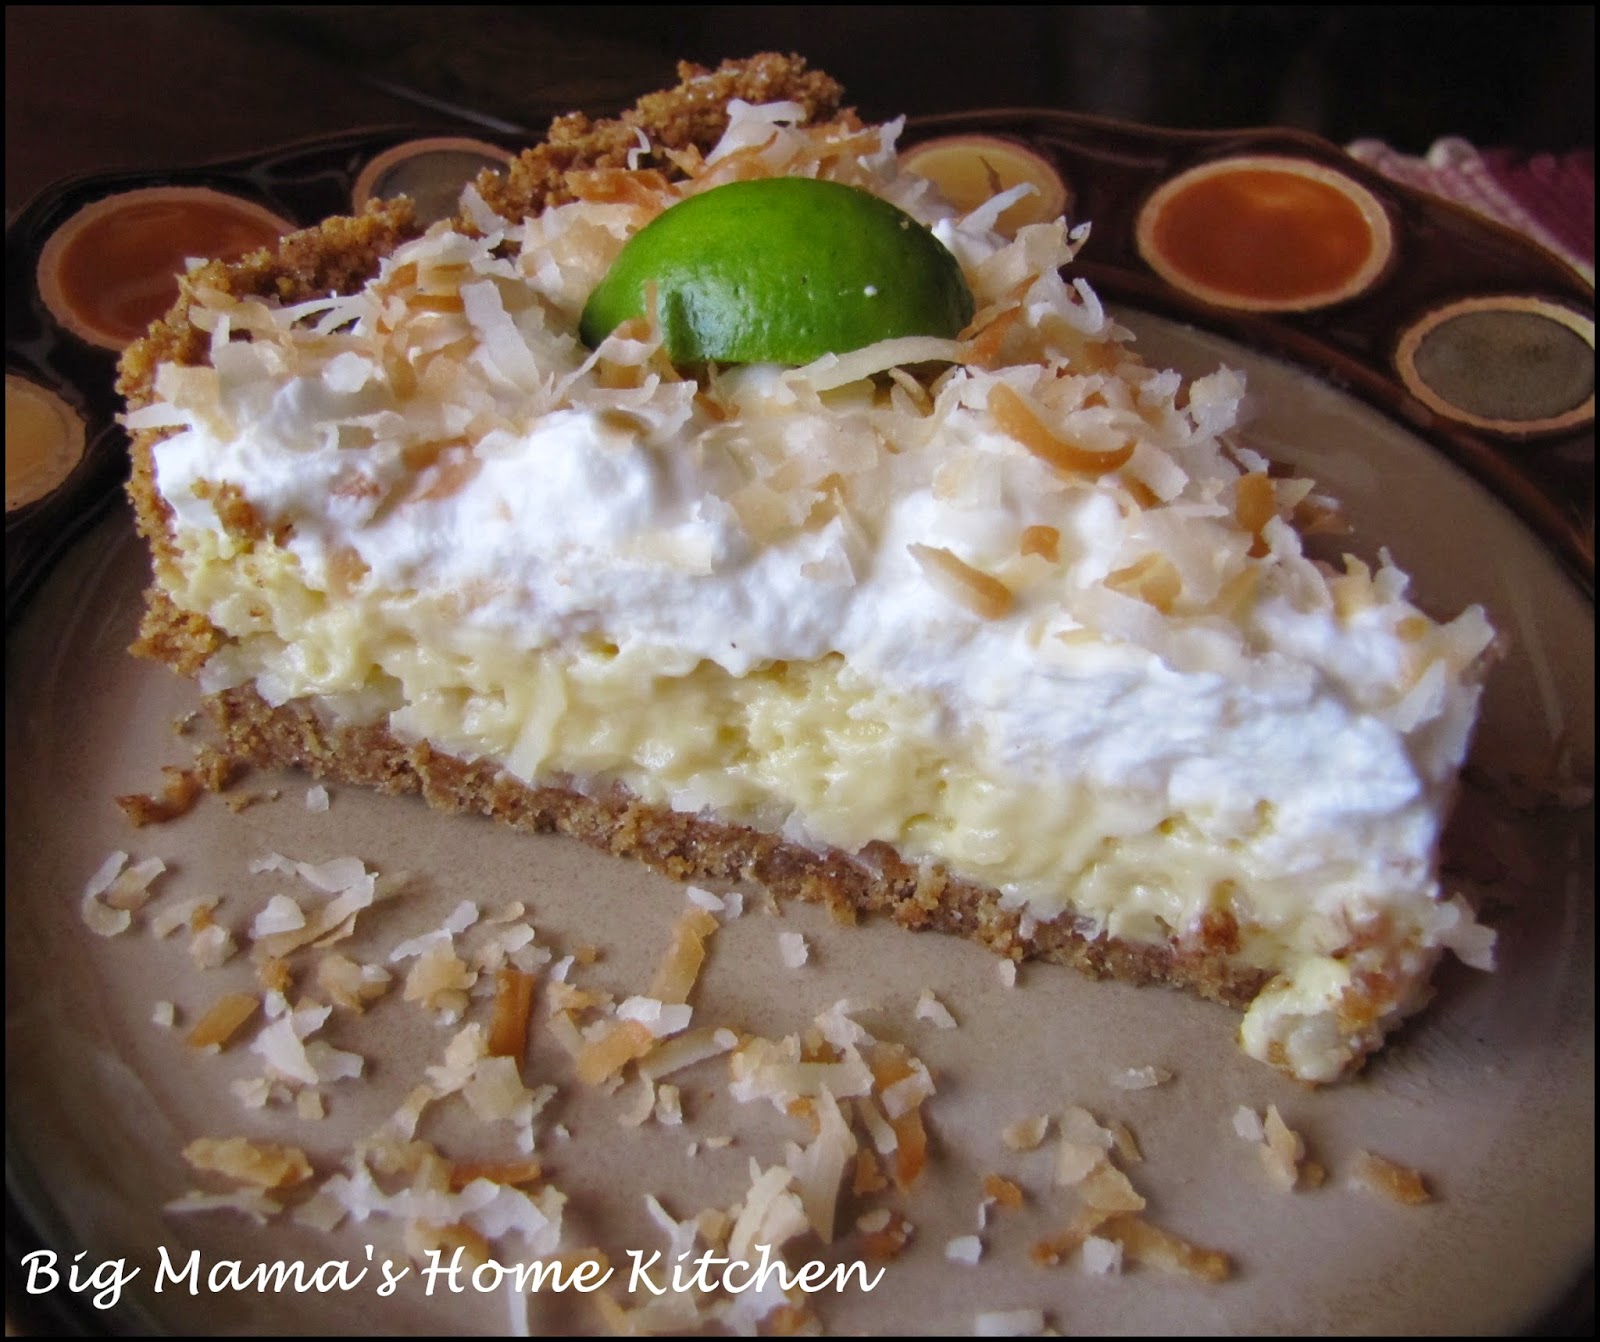
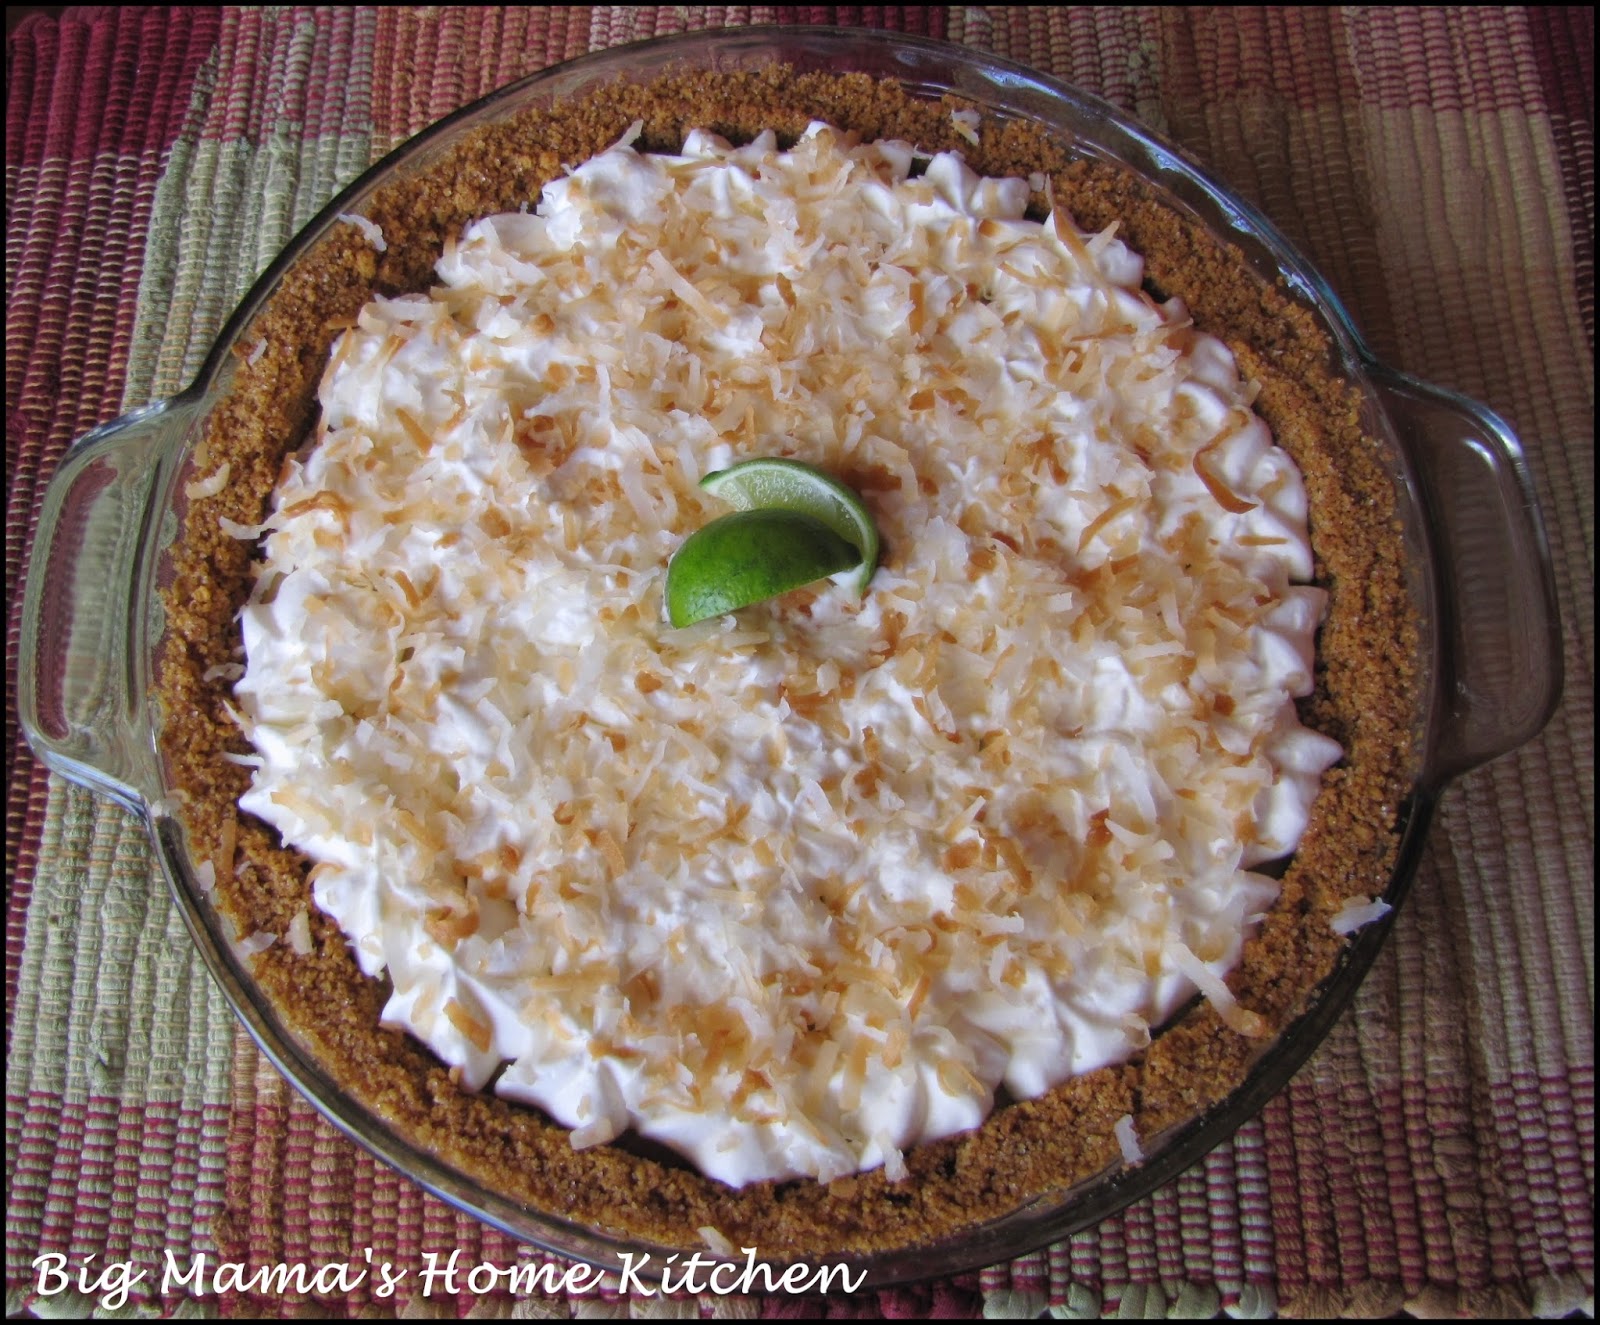
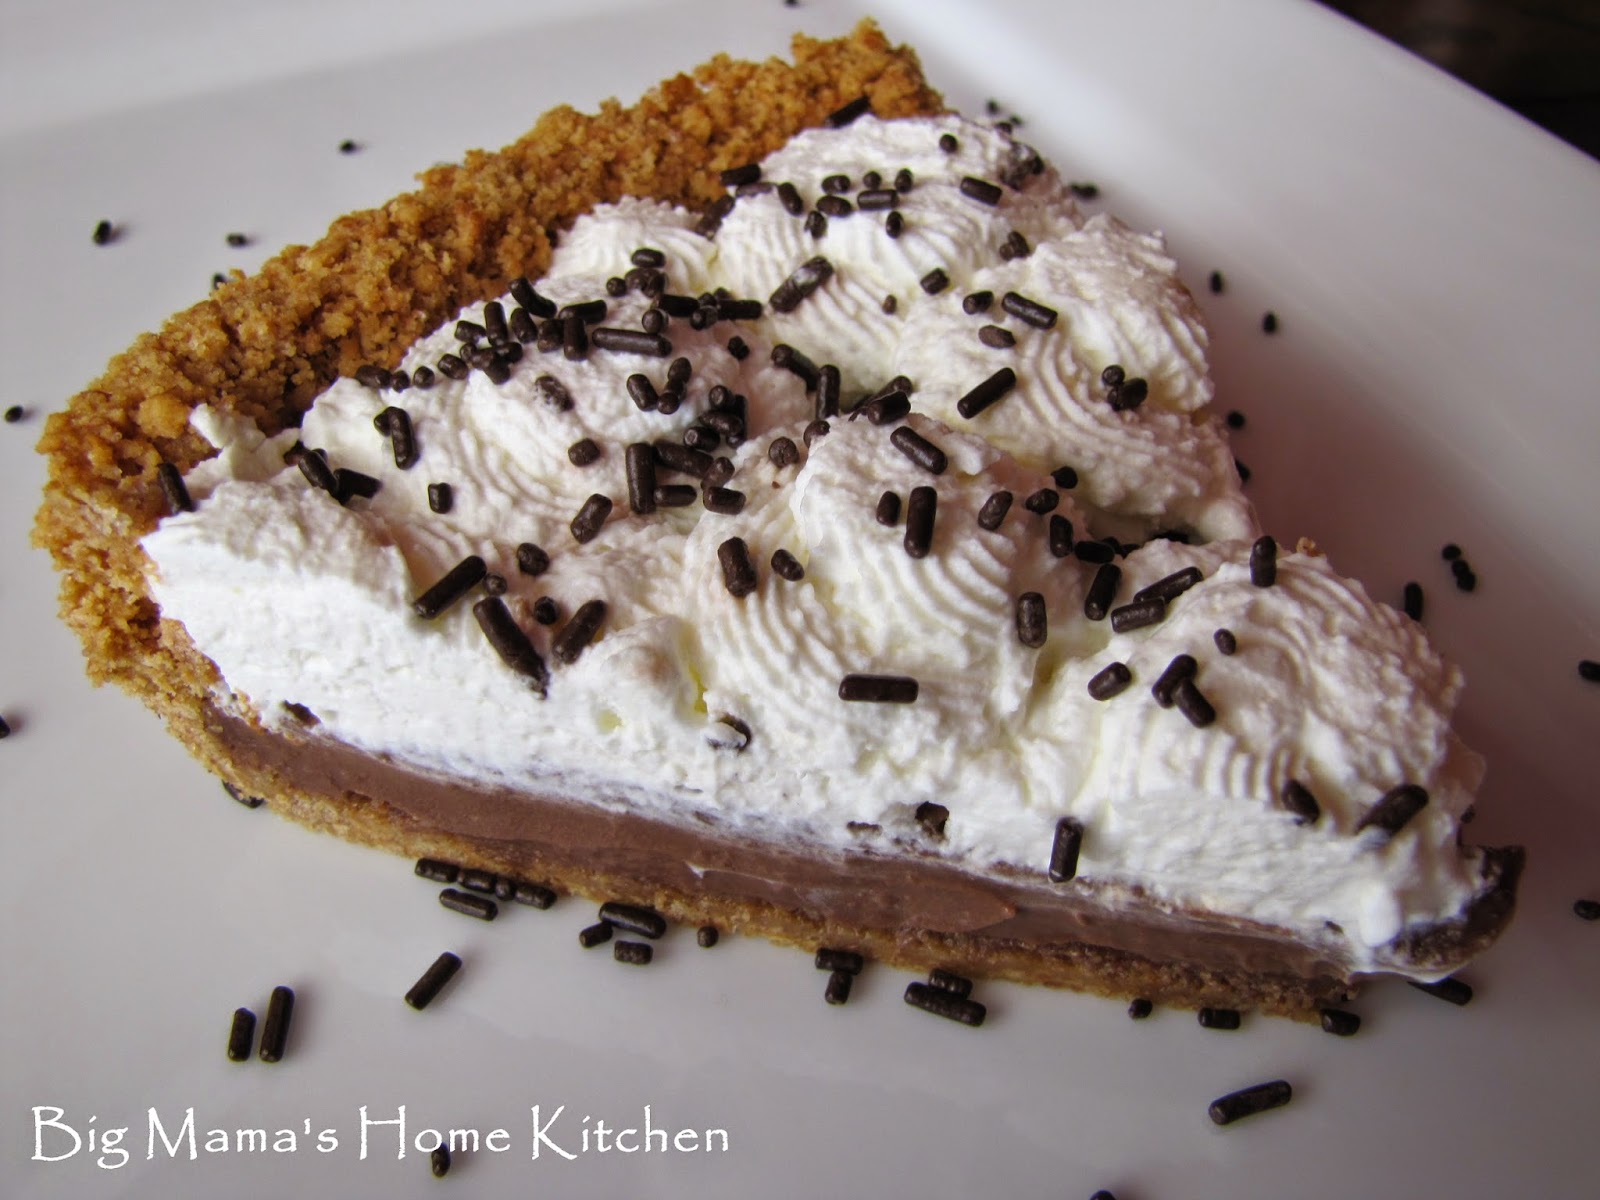
This classic pie is updated by using a homemade graham cracker.  The chocolate custard is cooked on the stove top, assembled, and chilled before topping with sweetened whipped cream.  The chocolate filling is much thicker than it looks in my photo.  It's the perfect combo of half chocolate, half whipped cream.  You might want to make two since it will go quick!  Recipe adapted from Southern Living 2005 on myrecipes.

Graham Cracker Crust:

1 1/2 cups finely crushed honey graham crackers
7 T unsalted butter, melted
2 T sugar
1/2 tsp cinnamon

Preheat oven to 350 degrees.  Spray a 9-inch pie dish with non-stick cooking spray.  In a small bowl, stir together all crust ingredients.  Pour into pie dish and use a metal measuring cup or flat bottomed glass to firmly press into the bottom and up the sides.  Bake for 10-12 minutes, or until light golden brown.  Cool competely before filling.

Chocolate Pie Filling: 

2/3 cup milk
3/4 cup semisweet chocolate chips
1/4 cup cold water
2 T corn starch
1 (14 oz) can sweetened condensed milk
3 large eggs
2 tsp vanilla extract
3 T unsalted butter
1 cup heavy cream
1/3 cup powdered sugar

In a medium sauce pan over medium heat, heat milk just until it bubbles around the edges (do not boil).  Remove from heat and stir in the semisweet chocolate chips.  Cool slightly.

In a bowl, whisk together the cold water and corn starch.  Add the sweetened condensed milk, eggs, and vanilla and whisk until combined.  Add to the chocolate mixture and whisk over medium heat.  Bring to a low boil, whisking constantly, for 1 minute.  Remove from heat and whisk in butter. 

Pour mixture into graham cracker crust and let cool slightly.  Cover with plastic wrap and refrigerate for at least 8 hours.

When ready to serve, whip the heavy cream until foamy.  Add the powdered sugar and whip until soft peaks form.  Spread or pipe onto chocolate filling.  Decorate with sprinkles, chopped chocolate bar, or chocolate shavings.  Enjoy!

Store leftovers covered in refrigerator.

Friday, October 28, 2011

Pumpkin Pie


Thanksgiving is just around the corner so I thought I better start testing some dessert recipes on my family.  I am not a pumpkin pie person, but most of my family loves it.  They said this pie was wonderful, and my little bite was good, but pass me the pecan pie.  This is a traditional pumpkin pie with a little layer of gingersnaps and cinnamon graham cracker crumbs between the pie crust and filling.  This recipe was slightly adapted from Joy of Baking.


Ingredients:

1 - 9 inch pie crust
1/4 cup crushed gingersnaps
1/4 cup crushed cinnamon honey graham crackers
3 large eggs
1 - 15 oz can pumpkin puree
1/2 cup + 3 T light brown sugar
1/2 cup heavy cream
1 tsp cinnamon
1/2 tsp salt
1/4 tsp allspice
1/4 tsp apple pie spice

Preheat oven to 375 degrees.  Place pie crust into 9-inch pie dish.  Put the gingersnaps and graham crackers in a large ziplock bag and seal.  Crush with a rolling pin until fine crumbs.  Sprinkle the crumbs over the pie crust, slightly up the sides, and press down lightly.  This keeps the pie crust from getting soggy and adds another layer of flavor.  Put pie crust in refrigerator while preparing pumpkin filling.

In a large bowl, whisk the eggs.  Whisk in the pumpkin puree and brown sugar.  Add the heavy cream and spices and whisk just until combined.  Pour into the cold pie crust.  Bake for 40-50 minutes, or until knife inserted one inch from the edge comes out almost clean.

Place on a wire rack to cool.  Serve at room temperature ttopped with sweetened whipped cream and garnish with additional crushed gingersnaps/cinnamon honey grahams.  Store leftovers in refrigerator.  Enjoy!

Thursday, October 27, 2011

Perfect Pie Crust


This is the easiest pie crust ever!  I've had many fights with pie crust over the years, but I finally found this recipe over at Martha Stewart.  Now we are besties and I will never use store bought again.  This recipe makes two 9 inch pie crusts, so you can wrap up the extra in plastic wrap, put it inside a freezer ziplock bag, and it's there for you when you need it.

Ingredients:

2 cups all purpose flour
1/2 tsp salt
3/4 cup (1 1/2 sticks) unsalted butter
3 T margarine or chilled vegetable shortening
1/4 cup (or less) ice water

In a food processor, add the flour and salt and pulse.  Cut the very cold butter and shortening into small squares.  Add to the flour and process until it resembles coarse meal.  Add the water a tablespoon at a time until dough just comes together.  You probably will not need the entire 1/4 cup of water.  Be careful not to over process.

Turn the dough out onto a floured work surface and divide in half.  Form into disks and wrap in plastic wrap.  Refrigerate for one hour before using.  If the dough has been in the refrigerator for longer, let it sit at room temperature for 15 minutes before rolling out or it will crack around the edges (I speak from experience!).

When ready to use, flour your work surface and rolling pin.  Roll out in one direction, turning the dough to keep the circle even until it's about 10 inches in diameter.  To transfer to the pie dish, you can either fold it on half or roll it around your floured rolling pin.  Gently place it in the pie dish leaving a 1/2 inch overhang. 

If you are making a single crust pie, you can now either fold the overhang under to create a thick border crust, or cut with a sharp knife for a thin border crust.  Then crimp with fingers or fork.

If you are making a double pie crust recipe, place the top crust over your filling before crimping or cutting the edges.  Make sure to seal the two crusts together using water or egg wash, then crimp or cut edges.

Here is a link from Betty Crocker about storing pies.  I keep extra pie dough discs in the freezer wrapped in plastic wrap and inside a freezer ziplock bag with the date written on the outside.  Betty Crocker says uncooked pie crust can be frozen for 2 months, and baked pie crusts for 4 months.

Use for your favorite pies, sweet and savory.  Enjoy!

Monday, August 15, 2011

Cinnamon Apple Crumb Pie


My hubby recently got back in contact with a friend from our high school days.  Todd told him how much I love to cook and bake and that I started writing my own cooking blog.  His friend said that his wife, Amy, also loves to cook and co-wrote a cookbook with a friend of hers, Grace.  I ordered it right away and stayed up late reading it  cover to cover the day it arrived in the mail.   

It is called Keeping Up Cookbook, Written by:  Grace Ivory Rock and Amy Henriksen Foulger


Amy and Grace also have a Blog, and a Facebook page.  Show them some love!

This cookbook has over 250 recipes, a "collection of tried and true favorites" they have "tested and tweaked during the last decade".  There are appetizers, breakfasts, baked goods, soups, salads, side dishes, dinners, sweets, and cookies (my favorite). 

There are many recipes I have bookmarked to try and will be sharing a few of them with you.  The first recipe is this amazing Cinnamon Apple Crumb Pie!  It was seriously so good!  The Fall season can't get here soon enough for me, but I think that apple pie is perfect year round.  Baked apples and cinnamon are a favorite combination in our home, and I have an entire category devoted to it on my blog. 

Can you believe I made a homemade pie crust too, and it was great?  I used Matha Stewart's pie crust recipe, which makes two crusts, so I have an extra one waiting in the freezer.

Ingredients:

1 (9-inch) deep dish pie crust, chilled

Apple Filling:

2 1/2 lbs Granny Smith apples (5 large), peeled, cored, sliced 1/4 inch thick
2/3 cup sugar (I used 1/3 cup)
2-3 T flour
2 tsp cinnamon
2 T butter, melted

Preheat oven to 375 degrees.  Place the pie crust in a 9-inch deep dish pie plate and refrigerate until ready to use.  Line a baking sheet with foil.

In a large bowl, stir together apples, sugar, flour, cinnamon, and melted butter.  Set aside.

Crumb Topping:

1 cup flour
1/2 cup brown sugar
1/4 cup sugar
1 1/2 tsp cinnamon
1/2 tsp salt
6 T cold butter, cut into small pieces

You can either use a pastry cutter, fork, or your food processor to blend the crumb topping ingredients together.  Mix together the flour, brown sugar, sugar, cinnamon, and salt, then cut in the chilled butter (or pulse in food processor) until mixture resembles coarse crumbs.

Transfer apple filling to chilled pie crust and sprinkle with crumb topping.  Place on foil lined baking sheet.  Bake for 45 minutes, then cover loosely with foil and bake for another 30 minutes.  Apples should be fork tender.  Cool for 1 hour to allow it to set up.  Serve warm with vanilla ice cream or whipped cream.  Enjoy! 

Note:  Leftovers can be reheated in the oven to keep the topping and pie crust crispy.  It's also really good cold from the refrigerator.

Wednesday, August 10, 2011

Key Lime Pie ~ Easy No Bake


This is a sweet and tangy key lime pie with a graham cracker crust and topped with Cool Whip.  It's so simple to make, especially if you are using a store bought pie crust.  I prefer to make the pie crust because I like it to be thicker and flavored with a touch of cinnamon.  You do have to bake the pie crust before filling, but only for 12 minutes.  You just blend three ingredients together for the filling, top with Cool Whip, and refrigerate until cold.  It's that easy.  If you like Key Lime Pie and Coconut Pie, check out this Key Lime Coconut Pie.  

Pie Crust Ingredients:

1 1/2 cups finely crushed honey graham crackers
7 T unsalted butter, melted
2 T sugar
1/2 tsp cinnamon

Preheat oven to 350 degrees.  In a small bowl, stir together all ingredients.  Spray a pie dish with non-stick cooking spray.  Firmly press the mixture into the pie dish, using a measuring cup to press it up the sides.  Bake for 10 minutes.  Cool completely before filling.

Pie Filling Ingredients:

2 - 14 oz. cans sweetened condensed milk
1/2 cup fresh lime juice (5 small limes or 20 key limes)
zest from 1 small lime or 3 key limes (optional)
1 tsp pure vanilla extract
1 - container Cool Whip (you can stir in 1/2 tsp vanilla if you like)

In a large mixing bowl, beat together the sweetened condensed milk for 3 minutes.  Add the lime juice, zest, and vanilla and beat until well combined.  Pour into the graham cracker crust.  Top with Cool Whip and spread to the edges.  Refrigerate until cold, about 4 hours.  Keep leftovers covered in refrigerator.  Enjoy!

Friday, July 8, 2011

Coconut Cream Pie


In celebration of my hubby's BIG 40th Birthday today, I made his favorite Coconut Cream Pie. He will be pleasantly surprised when he gets home from work.  We celebrated the big day with our family this past weekend, so he doesn't suspect another big dessert.  This is a tried and true recipe that I have made several times and is a family favorite.  It always makes it to the dessert table at Thanksgiving.


Ingredients:

1 - 15 oz. can cream of coconut (found on baking or non-alcoholic bottle mixes aisle)
1 1/2 cups heavy cream
3 egg yolks (save whites for meringue)
1/2 cup sugar
1/3 cup corn starch
1/4 tsp salt
1 1/4 cups shredded coconut
1 tsp pure vanilla extract
1 deep dish pie shell, baked

Preheat oven to 400 degrees.  Prick prepared pie shell with fork and bake for 12-14 minutes, or until golden brown.  Remove from oven and let cool on wire rack.  Lower oven temperature to 350 degrees.

In a medium saucepan, combine the cream of coconut, heavy cream, egg yolks, sugar, corn starch, and salt.  Bring to a boil over medium low heat, stirring or whisking often.  This may take a while, but be patient and don't turn up the heat.  

When mixture comes to a boil, turn heat down to low and stir constantly until thickened to the consistency of pudding or custard.  Remove from the heat, and stir in the shredded coconut and vanilla.  Pour into the prepared pie shell.

Meringue:

3 egg whites
1/4 tsp cream of tartar
1/4 cup sugar

Use a stand mixer or hand mixer to beat egg whites with cream of tartar until soft peaks form.  Gradually add the sugar and continue to beat until stiff peaks form.  Use a spatula to spread over the coconut filling all the way to the edges.  Use the spatula to make peaks in the meringue.  Sprinkle with 1/3 cup shredded coconut.  

Bake at 350 degrees for 10 minutes, or until meringue is set and coconut is lightly toasted. Remove from oven and let cool on a wire rack until room temperature.  Refrigerate for 4 hours until filling is firm and set.  After serving, store leftovers in the refrigerator.  Enjoy!

Monday, June 20, 2011

Peach Crisp


My grocery store finally has some fresh sweet peaches.  I was so excited to get home and make either a peach crisp or cobbler.  I decided on the crisp since my girls like the oat streusel type toppings best.  This recipe was adapted from Ann Burrell/Secrets of a Restaurant Chef.  Everything she makes looks delicious so I knew this would be a winner.  She used 6 - 6 oz. ramekins to make individual servings.  I used 2 mini casserole dishes that hold 3 servings each.  You can adjust your baking time depending on the size of dish you use.  We ate the peach crisp hot out of the oven with a big scoop of Blue Bell vanilla ice cream, and it was so good.


Filling Ingredients:

8 fresh peaches, peeled, pitted, and cut into chunks
1/2 lemon, zested and juiced
3 T all purpose flour
1/4 cup packed light brown sugar
2 T sugar
1/2 tsp vanilla extract
pinch of salt

Crisp Topping:

1/2 cup all purpose flour
1/3 cup old fashioned oats
1/4 cup packed light brown sugar
1/4 cup sugar
1/2 tsp cinnamon
6 T unsalted butter, cut into pieces
pinch of salt

Preheat the oven to 350 degrees.  Butter the ramekins or dishes you plan to use.  Line a baking sheet with foil and place ramekins on top.

In a large bowl, add the peaches and the remaining filling ingredients.  Toss well to coat.  Divide the filling evenly among ramekins. 

In a separate large bowl, add all the topping ingredients.  Use a pastry blender or fork to work the butter into the dry ingredients until it resembles coarse meal.  Sprinkle evenly on top of peach filling.

Bake for 20-25 minutes, or until filling is warm and bubbly and top is golden brown.  Enjoy with a big scoop of vanilla ice cream or whipped cream.

Note:  The bake time on the dishes I used was 30-35 minutes. 

Monday, May 9, 2011

Key Lime Coconut Pie


I bought a huge bag of key limes at the grocery store because it was only 88 cents.  I've been finding ways to use them these past two weeks.  We've used the key limes in carne asada tacos, guacamole, mexican shrimp cocktail, and of course, adult cocktails.  The remaining 20 key limes were used in this tangy Key Lime Coconut Pie.


I usually make a no-bake key lime pie, but wanted to venture out and try something new and original.  My hubby and daughter's favorite pie is coconut cream pie, and I only make it during the winter holidays.  I thought this key lime base would be delicious with some sweetened shredded coconut and vanilla extract.  I also added cinnamon to the graham cracker crust just like I do for my famous cheesecake.  I topped the pie with homemade whipped cream and garnished with toasted coconut.

Crust Ingredients:

1 1/2 cups finely crushed graham crackers
7 T unsalted butter, melted
3 T sugar
1 tsp cinnamon

Preheat oven to 350 degrees.  Spray a pie dish with non-stick cooking spray.

In a small bowl, stir together all crust ingredients.  Press into the bottom and sides of pie dish.  You can use a metal measuring cup or small glass to help press firmly up the sides.  Bake for 10 minutes.  Remove from oven and let cool on wire rack.

Filling Ingredients:

3 large egg yolks, room temperature
One 14-oz. can sweetened condensed milk
1/2 cup key lime juice
1 tsp vanilla extract
1 1/2 cups sweetened shredded coconut, plus extra for garnish

In a large stand mixer bowl with whisk attachment, beat the egg yolks until pale and fluffy, about 3 minutes.  Slowly pour in the sweetened condensed milk and beat for 5 minutes.  Add the key lime juice and vanilla extract and mix until incorporated.  Scrape down the sides of bowl and mix.  Remove the whisk attachment and stir in 1 1/2 cups shredded coconut.  Pour filling into cooled crust. 

Bake for 15 minutes, or until filling is set.  Place some coconut on a sheet pan to toast while the pie is baking, which will take about 10 minutes.  Remove pie from oven and let cool to room temperature on wire rack.  Cover with plastic wrap and refrigerate for 4 hours.

When ready to eat, you can make the whipped cream.

Whipped Cream:

1 cup heavy whipping cream
3 T granulated sugar

In a stand mixer bowl with whisk attachment, beat together the heavy cream and sugar until stiff peaks form.  Pipe or spread onto pie.  Garnish with toasted coconut.  Store in the refrigerator.

Adapted from Joy of Baking

Friday, April 22, 2011

Strawberry Tarts by Little Chef Taylor


My daughter Taylor checked out Cooking 123 by Rozanne Gold from the library this week.  This is an entire cookbook filled with 500 recipes containing only three ingredients.  She wanted to make the same French Apple Tarts as Madison did a few months ago.  I suggested we change it up and make Strawberry Tarts since they are in season right now.  She was so excited since it's her favorite fruit.

I thawed out the puff pastry before picking them up from school, and she got right to work when we arrived home yesterday.  She did an excellent job and I'm so thrilled my girls enjoy baking like their Mommy.  The tarts were amazing!  My girls will be surprised when they open up their snack box at school to find another sweet Strawberry Tart.

Ingredients:

1 sheet puff pastry, thawed
1 lb strawberries, hulled and sliced
1 T sugar (optional)
1/4 cup apricot jelly + 1 T water

Preheat oven to 375 degrees.  Spray a large non-stick baking sheet with cooking spray.

Sprinkle some flour on work surface and unroll puff pastry.  Roll out slightly using a floured rolling pin.  Cut the dough in half lengthwise, then into quarters to get 8 rectangles.  Transfer to baking sheet.  Use the tines of a fork to create a 1/4 inch border around each edge.


Prick the center of each dough so it doesn't puff up when baking.


Arrange strawberry slices on the center of each rectangle in an overlapping pattern, leaving the border clear.


Sprinkle each with a little sugar.  Bake for 22-25 minutes, or until edges are golden brown and slightly puffed up.

Meanwhile, heat the apricot jelly and 1 T water.  Brush each warm tart with melted jelly.  Serve warm or at room temperature.  These are great dusted with powdered sugar or drizzled with powdered sugar/vanilla glaze before serving.  Enjoy!

Thursday, February 10, 2011

Apple Pie


Warm apple pie has to be the most comforting dessert when it's cold outside.  I made this the day we played outside on our snow day. 


This pie can be made quickly by using refrigerated pre-made pie crusts.  Just a few simple ingredients, about 45 minutes in the oven, and you will be able to enjoy a piece of warm apple pie...a la mode if you please!

Ingredients:

1 Box Pillsbury pie crusts (2 crusts)
6 large Granny smith apples, peeled, cored, and sliced thin
1/4 to 1/2 cup granulated sugar (depending on how sweet you like your pie)
1/4 cup brown sugar
1 tsp apple pie spice
1 tsp cinnamon
3 T flour
egg + 1 T water, for egg wash
sugar and cinnamon, for top crust garnish

Preheat the oven to 350 degrees.  Remove your pie crusts from the refrigerator and let them come to room temperature. 

Prepare your apples by peeling, coring, and slicing them into thin strips.  Add them to a large bowl of water with a splash of lemon juice as you are slicing them to keep from browning.

Press a pie crust into the bottom of a deep dish glass pie pan.  Drain and pat the apples dry.  Place them back into the large bowl.  Add the granulated sugar, brown sugar, apple pie spice, cinnamon, and flour to the apples and stir to coat them evenly.

Pour the apples into the pie crust and mound slightly.

Now, you can either use a cute shaped cookie cutter for the top crust, or just place the crust on top and cut slits to allow the steam to escape.  I used our Valentine heart shaped cookie cutters to decorate the top crust.  Use your fingers to crimp and seal the crust edges together.

Brush the top and edges with egg wash.  Sprinkle with sugar and cinnamon.

Bake for 30 minutes.  Cover crust with foil, and continue to bake another 15 minutes, or until golden brown and apples are tender.  Let cool slightly before cutting so it will set up.  Enjoy with a big scoop of ice cream! 

Thursday, January 20, 2011

French Apple Tarts by Little Chef Madison


Madison checked out two cookbooks from her school library this week.  One was for me and her Daddy...Bob Green's The Best Life Diet CookbookHow sweet of her to think of her poor starving parents struggling with this South Beach diet!

The other is Cooking 123 by Rozanne Gold.  This is an entire cookbook filled with 500 recipes containing only three ingredients.  Genius!  I told Madison to look through it and find something she wanted to make.  Of course, she went straight to the desserts section...a girl after my own heart!  She loves desserts with baked apples, so she chose the French Apple Tarts. 

We already had everything (all 3 ingredients) on hand, so she was excited to make them today after school.  I let her put off her studying until after our baking session so we would have plenty of sunlight for better photos.  I had fun documenting her.  She's so serious and focused in the kitchen.  And a little perfectionist too.

Madison's French Apple Tarts turned out beautifully and were really tasty.  I know that I'm on a diet, but if my little girl bakes something special for her family, I'm going to eat it.  I can't wait until she makes some more!  These are a great breakfast, snack, or dessert.  This recipe makes 6 tarts.

Ingredients:

1 sheet puff pastry
1-2 Granny smith apples (depending on size)
1/2 cup apricot jelly or jam

Preheat oven to 375 degrees.  Spray a non-stick baking sheet with cooking spray. 

Thaw puff pastry until pliable, but still very cold.  Cut the dough in half lengthwise, then across into thirds to get 6 rectangles.  Using the tines of a fork, prick a 1/4 inch wide border on each side of pastry.


Prick the center portion thoroughly with the fork. 


Place pastry on baking sheet.

Heat the apricot jelly with 1 T water in a small saucepan over low heat until melted.  Keep warm.

Peel, core, and seed apples.  Slice them into very thin wedges.  Arrange slices in an overlapping pattern on top of each pastry, leaving the borders clear. 


Brush the apple slices with melted jelly using a pastry brush.


Snack on the leftover apples.


Bake for 22-25 minutes, or until edges are golden brown and puffy.  Remove tarts from oven and brush apples and sides of pastry with melted jam...oops, we forgot to do this.  Garnish with powdered sugar.  Serve warm or at room temperature.  We heated them for 10 seconds in the microwave to enjoy after dinner.  Enjoy!


Thursday, December 9, 2010

Old Fashioned Chicken Pot Pie


This one is for my favorite Mom #2.  She said that she would like to see me make a homemade Chicken Pot Pie.  Well, here is my first attempt and it turned out great!  My kids ate every bite on their plate.  Chicken and vegetables in a creamy sauce rucked inside a buttery crust has to be good.  I read some various recipes and this is what I came up with to please my family.  Now that I've used my kids and hubby as guinea pigs for this dish, I can make it for my MIL next time she has dinner with us.

Ingredients:

2 pastry crusts (homemade or store bought)
1 lb boneless skinless chicken breasts, cut into cubes
2 T olive oil
1 yellow onion, diced
3 cloves garlic, minced
2 T unsalted butter
1/2 cup flour
3-4 cups chicken stock
1 cup broccoli florets, partially steamed
1 cup diced baby carrots, partially steamed
1 can (15 oz) sweet peas
1/2 cup heavy cream
1/4 cup fresh flat leaf parsley, chopped
kosher salt
black pepper
egg (for egg wash)

Preheat oven to 375 degrees.  Season chicken with kosher salt and pepper.  In a large deep skillet over medium high heat, add 1 T olive oil.  Add the chicken and cook completely, about 8 minutes.  Remove to a bowl and set aside.  Add 1 T olive oil to skillet and cook the onions until translucent.  Add the garlic and cook another minute.  Add the 2 T butter and melt.  Sprinkle in the flour and cook for 2 minutes while stirring.  Add the chicken stock and cook for 5 minutes until mixture thickens. 

Let me teach you a cool way to steam vegetables in the microwave instead of dirtying up your steamer.  Place your raw vegetables in a microwave safe bowl with 3 T water and cover with a dinner plate.  Microwave on high for 4-5 minutes, or until tender.  I only cooked mine for 3 minutes so they were still slightly crisp.  The vegetables will cook more in the oven.


Add the cooked chicken and vegetables to the sauce and stir well.  Turn off the heat and add the heavy cream and parsley.  Taste and season with kosher salt and pepper as needed. 


This makes quite a bit of filling, so you will either need a large and deep round casserole dish or deep pie dish.  I used an oven proof serving bowl.  Another option is to use oven proof bowls (like you use for french onion soup) and just top with the pastry crust.  This way, everybody could have their own little chicken pot pie.  I need to buy some of these!

Line your casserole or pie dish with a pastry crust.  Pour in the filling.  Place the other pastry crust on top, and seal and crimp the edges.  Make a slit in the middle of the crust to allow the steam to escape.  I used a big and small snowflake cookie cutter to make it look cute.  Brush the top with egg wash and sprinkle with kosher salt and black pepper.


Bake for 45 minutes, or until crust is golden brown and filling is bubbling.  Let cool for 15 minutes before trying to cut.  Enjoy!

Saturday, November 27, 2010

Thanksgiving 2010

Thanksgiving was a success!  Our family and friends joined us for a day full of fun, food, and Dallas Cowboys football. I love my family! Here's what we did...

The week before, my girls made some salt dough Christmas tree ornaments to give to our family and friends on Thanksgiving day. 


The menu was finalized, and only one item didn't make it to the table...the caramel apple pie.  We already had 3 desserts, which was plenty for 12 people.  


Thanksgiving Dinner 2010

Appetizers

Spinach Dip with Tortilla Chips
Chilled Shrimp with Cocktail Sauce
Cheese/Salami/Cracker Platter
Fruit Tray with Thanksgiving Fruit Dip

Dinner

Bill’s Famous Deep Fried Turkey
Honey Baked Spiral Ham
Country Dressing
Roasted Garlic Mashed Potatoes with Turkey Gravy
Macaroni and Cheese
Green Bean Casserole
Vegetable & Tomato Tian
Sweet Potato Casserole
Cranberry Sauce
Dinner Rolls

Desserts

Caramel Apple Pie
Coconut Cream Pie
Maple Pecan Pie
Pumpkin Cheesecake with Caramel Sauce
Fresh Whipped Cream And/Or Vanilla Ice Cream
 
The night before Thanksgiving, my oldest daughter helped me make all this good stuff:

Cranberry Mandarin Orange Sauce
Coconut Cream Pie

Maple Pecan Pie

Pumpkin Cheesecake (topped with caramel sauce later)

The dinner rolls were also prepared and put in the fridge to rise overnight. 


The tables were set


The Thanksgiving wreath I made earlier that day was on the front door to welcome our family and friends


And it's finally time for some shut eye before finishing up in the morning! ZZZZZzzzzzZZZZZzzzzzz

I woke up bright and early to finish preparing the rest of the side dishes for our big dinner.  The ladies in the family set up all the appetizers on the kitchen table. 


My girls were hungry and thirsty...they dug right in


The girls patiently waited at the front door for our family to arrive


Family arrived...


Bill fried up our turkey


Just look at this big moist Turkey with crispy skin!


While the ladies helped me finish up the rest of the meal. 


The girls are ready to eat


The food's hot and ready...amazingly so!

Bill's Fried Turkey
Honey Glazed Ham

Country Dressing

Mom's Cheesy Green Bean Casserole
Sweet Potato Casserole
Vegetable and Tomato Tian
Garlic Mashed Potatoes & Turkey Gravy
Bill's Pea Salad
After the big Turkey dinner, we were all stuffed. It was time to relax and enjoy some family fun time. Our girls put on a concert for us. Our Taylor wants to be the next Taylor Swift...


and Jordyn will be her backup musician...


while Madison watches with pride...


I'm so thankful for my family! I love them all so much!


Related Posts with Thumbnails