Sunday, January 30, 2011

Honey BBQ Cheesy Sloppy Joes


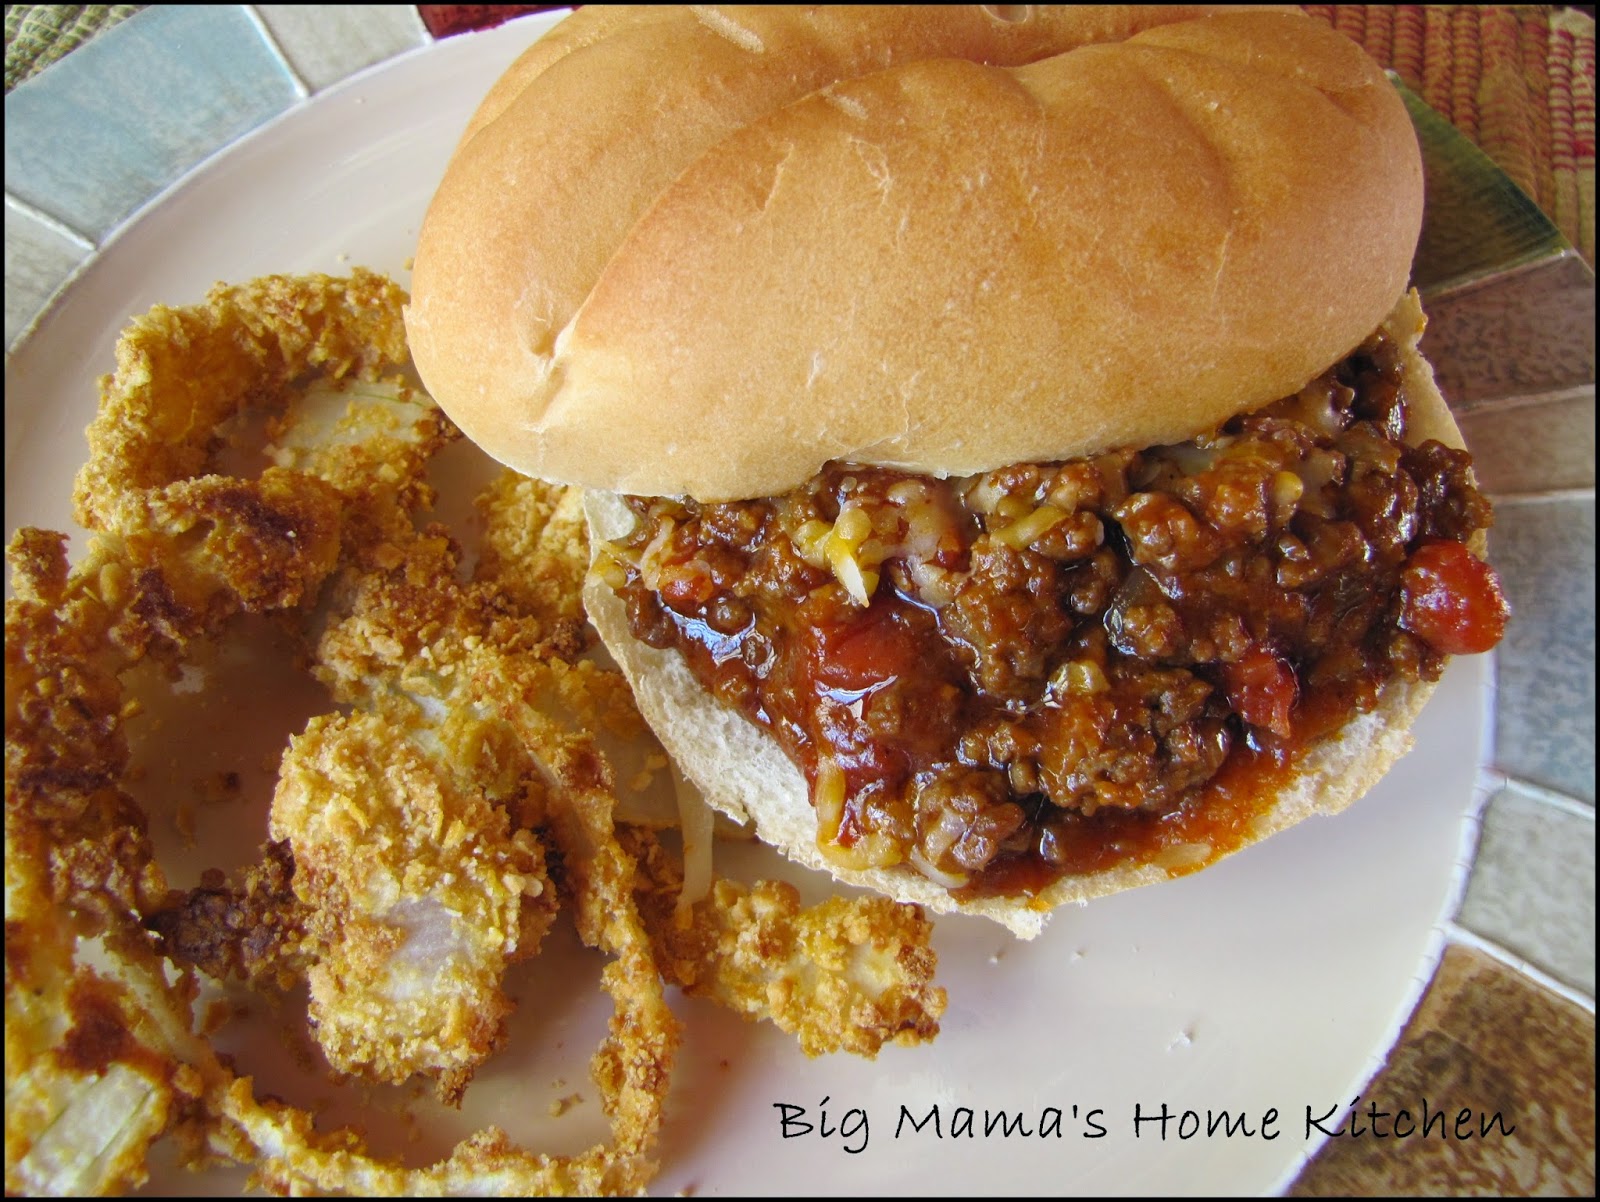
OK, so the South Beach Diet is off.  It just wasn't my kind of life!  That being said, I love a good and messy Sloppy Joe!  So when I saw these on SteakNPotatoesKindaGurl this morning, I just knew I had to make them.  I already had some fresh bakery club rolls in the pantry and lean ground beef in the fridge.  These were the perfect amount of sweet and plenty sloppy.  They were fabulous!  The original recipe from Tried and True Cooking With Heidi is an open faced sandwich using Texas Toast as the base, which is how my hubby will probably want to eat his tonight when he gets home from work.  I used hot dog buns for my girls since they have little bitty mouths.  Whatever bread you decide to use will work just fine to soak up all those juices.

Ingredients:

1 lb lean ground beef (93/7)
1/2 yellow onion, diced
1 can petite diced tomatoes, drained
1/2 cup ketchup
1/2 cup Honey BBQ sauce
3 T Worcestershire sauce
1/2 tsp garlic powder
1/2 tsp ground cumin
1/2 tsp chili powder
1/4 tsp smoked paprika
dash of cayenne pepper
shredded cheddar jack
Club rolls/hamburger buns, or bread of choice

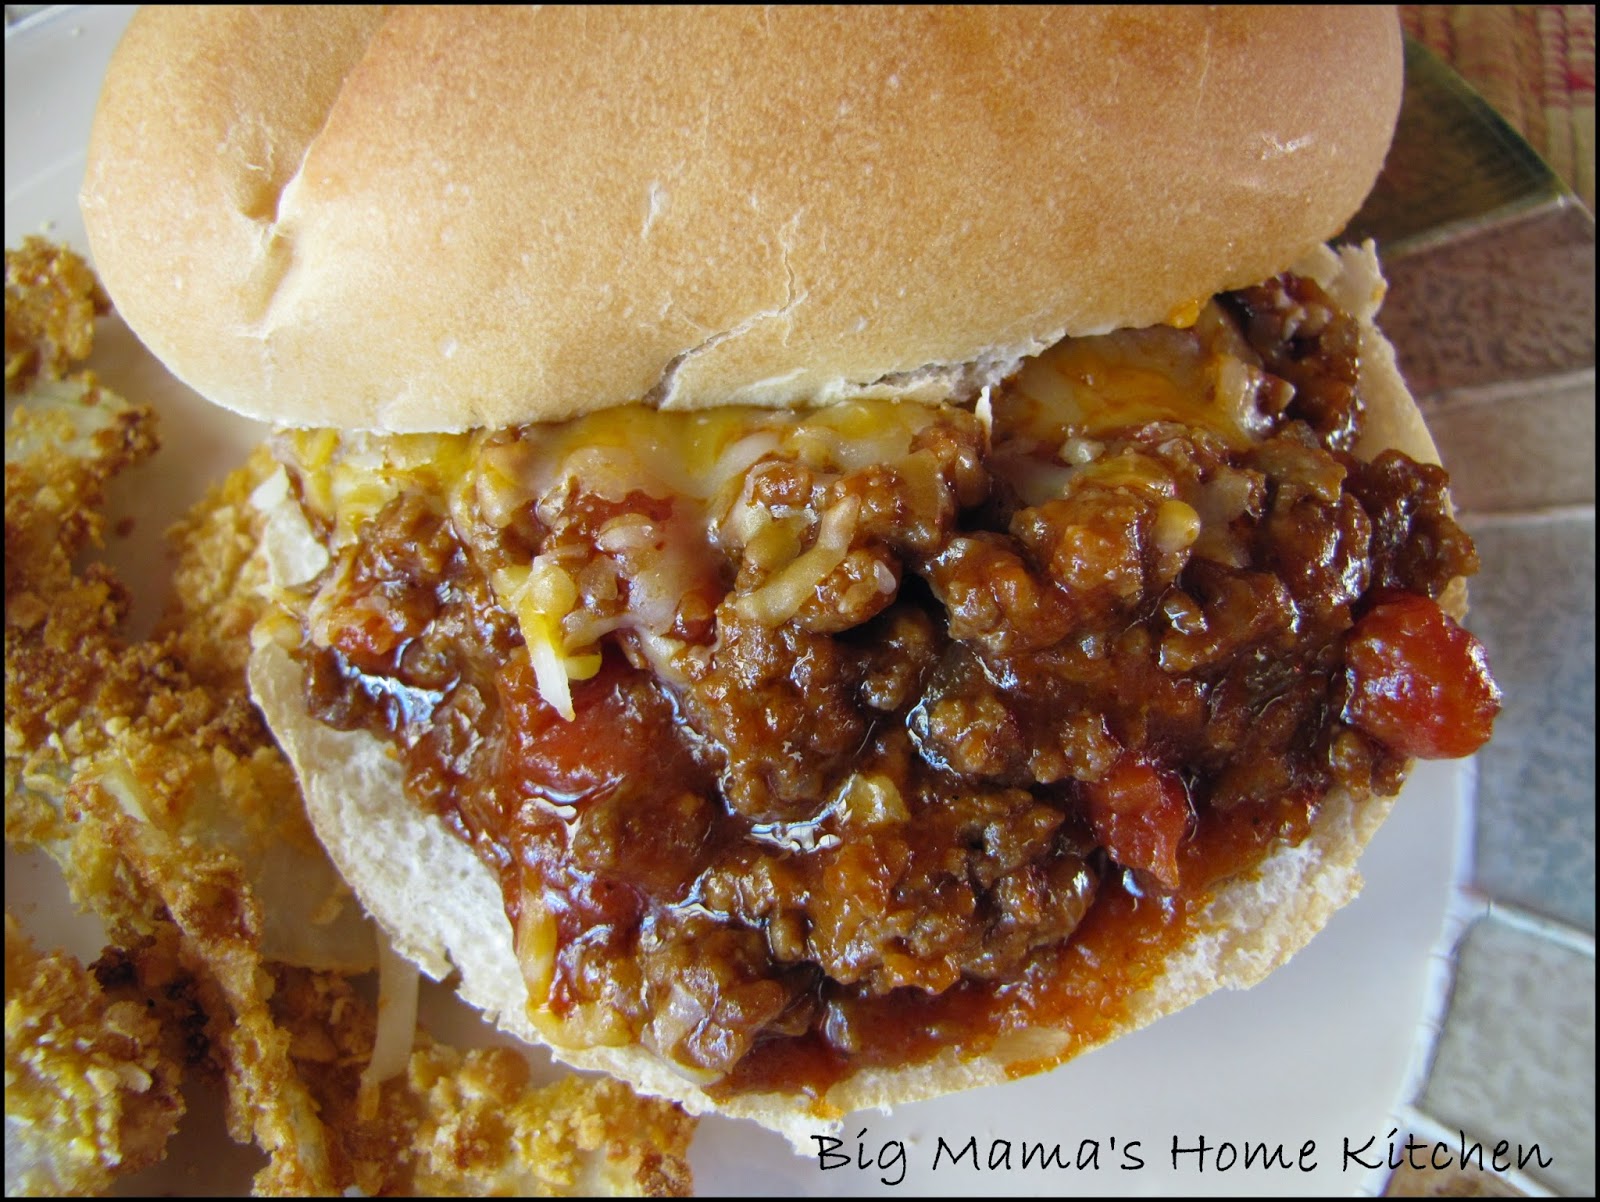
In a large skillet over medium high heat, brown ground beef until cooked through and no longer pink.  Add the onions and cook for 5 minutes.  Drain off the grease.  Add the tomatoes, ketchup, BBQ sauce, Worcestershire, and spices.  Stir well and cover.  Lower heat and simmer for 15 minutes, stirring occasionally. Uncover and simmer another 5 minutes until mixture is thickened up.

I have a little trick I use when eating sloppy joes on rolls or buns.  I hollow out the center of both the top and bottom insides before adding the sloppy joe filling.  This way, it stays in the roll instead of falling out onto your plate, the floor, your shirt, your jeans, your shoes...you get the point! 

Serve up on some warm toasted buns and top with shredded cheese.  I made some Oven Baked Onion Rings on the side.  I'm still full and only ate half...Enjoy!


Saturday, January 29, 2011

Bean and Taco Meat Loaded Tostadas


This is a quick weeknight meal that I know everybody, including your kids, will love!  These tostadas can be topped with your favorites.  We like to set out all the toppings and make our own.  The taco meat is very flavorful, using a homemade taco seasoning and simmering until nice and thick.  I use fat free refried beans and bake the corn tortillas until nice and crispy.  Serve with some Mexican or Spanish Rice.

Ingredients:

1 lb lean ground beef (93/7)
1/2 yellow onion, chopped
2 cloves garlic, minced
1 cup cold water
1 T corn starch

Taco Seasoning:
1 T chili powder
2 tsp smoked paprika
2 tsp ground cumin
1/2 tsp kosher salt
1/4 tsp black pepper
1/4 tsp garlic powder
1/4 tsp onion powder
pinch red pepper flakes

Corn tortillas
Cooking spray
1 can fat free refried beans

Toppings of choice:

Shredded lettuce
Shredded cheese
Tomatoes
Sour cream
Hot sauce/picante sauce
Guacamole/diced avocados
Pickled jalapenos

Preheat oven to 400 degrees.  Place corn tortillas on a non-stick baking sheet and spray with cooking spray.  Sprinkle with kosher salt.  Bake for 8 minutes, or until lightly golden brown and crispy.

In a large skillet over medium high heat, brown ground beef until cooked through.  Add the onions and cook until tender.  Add the garlic and cook another minute.  Add the taco seasoning ingredients, and cook for another minute while stirring..

In a glass measuring cup, stir together 1 cup cold water with 1 T corn starch.  Add to the skillet and stir well.  Reduce heat to medium low, cover, and simmer for 10 minutes.  Sauce will be nice and thick.

Meanwhile, heat the refried beans and prepare toppings.

Assemble your tostadas, layering refried beans, taco meat, then your favorite toppings.  
Enjoy

Friday, January 28, 2011

Valentine Chewy Sugar Cookies


I wanted to make my hubby and girls some Valentine cookies this weekend, and sugar cookies are their absolute favorite.  My hubby likes his sugar cookies simply rolled in sugar.  My girls like theirs with almond flavored icing and pretty sprinkles.  I always make them both ways so everybody is happy.  

I have a few sugar cookie recipes that I use for rolled cookies.  I also have a few recipes for drop cookies.  But none of them have the chewy texture that we really love, so I went on a google search to find the perfect Chewy Sugar Cookie recipe.  My family is so happy that I finally found it at Fine Cooking.

I decorated my girls' sugar cookies by drizzling with almond icing, and then using sprinkles, jimmies, and candies.  I decorated my hubby's by rolling in blue sanding sugar before baking.  They all vanished within a day.  I was only able to make 16 large cookies with this recipe, so you might want to double the recipe just to be sure you have enough for a couple of days! 

Ingredients:

3/4 cup plus 2 T granulated sugar
1/2 cup unsalted butter (1 stick), softened but not melting soft
2 T butter flavored shortening
1 large egg
1 T light corn syrup
1 tsp vanilla extract
1 tsp almond extract
2 cups plus 2 T all-purpose flour
1 tsp baking powder
1/2 tsp baking soda
pinch of salt
sugar, or colored sanding sugar for rolling (if using)

Preheat oven to 350 degrees.  Line two baking sheets with parchment paper, or use non-stick cookie sheets. 

In a large stand mixer bowl, cream together the sugar, butter and shortening until light and fluffy, about 2 minutes.  Scrape down the sides of the bowl.  Add the egg, corn syrup, vanilla extract, and almond extract and beat for 1 minute.

In a bowl, whisk together the flour, baking powder, baking soda, and salt.  Add to the wet ingredients and mix just to combine, scraping down sides as needed.

Roll the dough into walnut size balls.  Roll in sugar or colored sanding sugar (if using).  Arrange on a baking sheet one inch apart.  Bake for 11-13 minutes, or until the edges are golden brown and the tops are slightly cracked but not completely set.  Let the cookies cool on the hot cookie sheet for 3 minutes, then remove to a wire rack to cool completely.

Almond Icing

1 cup powdered sugar
1/2 tsp almond extract
milk

In a small bowl, add the powdered sugar and almond extract.  Stir in just enough milk to get the right consistency for drizzling.  Put icing in a plastic sandwich bag and snip a small corner of the bag.  Drizzle over top of the cooled cookies and decorate with sprinkles, jimmies, or candies.  Enjoy!


Thursday, January 27, 2011

Valentine Sweetheart Cupcakes


Here are some very pretty Valentine cupcakes!  I found the google image that was posted from All Recipes and just had to go see how to make these colorful cupcakes.  They start off with a simple cake batter, which is then divided up and dyed for the separate layers. 

 I used my favorite Vanilla Cupcake and Buttercream recipe.  You could also simply use a white or yellow cake mix and canned frosting.  But if you have the time, I would recommend trying out my cupcake recipe...it's the bomb!!!

Directions:

Preheat oven to 350 degrees.  Line cupcake tins with paper liners.  Make the cupcake batter per instructions.  Fill the cupcake liners 1/3 of the way full with plain white or vanilla batter.  Place 1/3 of the remaining batter in a bowl and dye pink.  Dye the remaining 2/3 batter with red dye.  Place both the pink and red batter in separate piping bags fitted with a small round tip.  Pipe about 2 Tablespoons of the red batter into the middle of each white cupcake.  Pipe about 1 Tablespoon of pink batter into the middle of the red batter. 

Note:  I also piped a couple of cupcakes with pink on the outside circle, and red in the middle (pictured on the right cupcake above).  They both turned out really cute! 

TIP:  You can pipe any colors to match a theme or holiday, i.e. red/blue for July 4th, red/green for Christmas, etc. and match the frosting and decorations.

For our Super Bowl party this weekend, I'm going to make some with black/gold for the Pittsburgh Steelers, AND some with green/yellow for the Green Bay Packers.  That way, everybody can choose their team's cupcake to enjoy!

Bake per instructions of cupcake recipe.  Remove from oven and let cool in pan for 3 minutes.  Transfer to a wire rack to cool completely.

Prepare your frosting and dye pink or red.  Pipe onto the cooled cupcakes and decorate with sprinkles, sanding sugar, candies, or jimmies.  Enjoy!


Linked up at:


Wednesday, January 26, 2011

Valentine Pancakes with Blueberry Sauce


I love waking up early on Sunday morning and drinking my coffee while making my family a nice breakfast.  I bought some heart shaped cookie cutters at the store this week, and knew just what I wanted to make first using them.  Heart pancakes with a special blueberry sauce were the perfect breakfast to show my love for my family.  They are fast and easy, no measuring cups required, since I always use Hungry Jack Buttermilk Complete pancake mix.  If I'm going to get out measuring cups, I'm making Cinnamon RollsBanana Blueberry Streusel Muffins, or Mini Doughnut Muffins!  But today, it's all about simple and pretty pancakes. 

Ingredients:

Pancakes, cooked per instructions on box (or your favorite homemade recipe)
1 cup fresh or frozen blueberries
2 T water
1/4 cup maple or pancake syrup

Cook pancakes and set aside in a single layer on a cutting board.  Cut out heart shapes using cookie cutters.

In a small sauce pan over medium heat, add the blueberries and water.  Cook for 5 minutes, stirring occasionally.  Add the syrup and cook another few minutes.  

Plate up pretty heart pancakes, dollop on some butter, and top with blueberry sauce.  We also like to finish ours off with a light dusting of powder sugar (not pictured).  Enjoy!


Tuesday, January 25, 2011

Deconstructed Individual Surprise Beef Wellingtons


It's time to celebrate!  We finally finished preparing our 2010 taxes.  I made our family a gourmet meal to enjoy at our fancy formal dining room table we only use for holiday meals.  The girls stayed up late, and we ate ice cream after dinner.  It was the perfect evening at home!

I am a huge fan of Hell's Kitchen and the infamous Gordon Ramsay.  I have admired his Beef Wellingtons throughout all the seasons of Hell's Kitchen.  I wanted to make it a little fancier by making them in individual pockets of puff pastry, with the sauce on the outside.  I topped the tenderloins with a flavorful garlic and thyme cream cheese.  The baby portobello mushroom sauce was made with red wine, beef consomme, balsamic vinegar, and rosemary.  There are a lot of flavors going on here, and the sauce was just a little extra something.  A little bit of this sauce goes a long way. 

This is definitely a weekend or celebratory meal as it takes some time to prepare.  I served it with Parmesan Crusted Roasted Green Beans and Roasted Rosemary potatoes.  Delish!


I tried to document the process thoroughly, but my kitchen lighting is the worst at night.  

Beef Wellington Ingredients:

1 1/2 lb beef tenderloin, cut into 4 individual steaks (about 3/4 inches thick)
kosher salt
black pepper
1 T canola oil
1 T olive oil
1 sheet puff pastry, thawed
4 oz. cream cheese, very cold
3 cloves roasted garlic, or 1/2 tsp garlic powder
1 stem fresh thyme leaves

Preheat oven to 400 degrees.  Dry the steaks thoroughly with a paper towel, and season with kosher salt and pepper. 

In a large cast iron skillet on high, heat the canola and olive oil until smoking.  Add the seasoned steaks and sear them on the first side for 3 minutes.  Turn them over and sear the other side for 2 minutes.  Use tongs to help you sear the sides of all steaks.  This will help seal in the juices while they are baking inside the puff pastry.  Remove to a plate and let rest in the refrigerator for 10 minutes. 

In a small bowl, mix together the cream cheese, garlic, and fresh thyme.  Refrigerate until you are ready to assemble. 

Unroll the thawed puff pastry onto a lightly floured surface.  Roll about 1/2 inch on all sides.  Cut into 4 equal squares.  Place a steak into the middle of each puff pastry square.  Top with 1 oz. of the cream cheese mixture. 


Brush the edges of pastry with egg wash.


Turn the steaks over so they are now cream cheese side down. 


Fold the puff pastry sides up over the steak, and press to seal.  Turn them back over and brush surface with egg wash.  Score lines in the top using a sharp knife.


Place the wrapped steaks on a baking rack over a jelly roll pan.  This will catch the steak juices, if any come out, and will help the bottom of the pastry cook.  

Bake for about 20 minutes, or until lightly browned.  This should bring them to about medium-rare doneness.  Remove from the oven and let them rest on the hot pan for about 5 minutes.  They will continue to cook to a true medium.  At least this was my experience.  You can always use a meat thermometer to test doneness.

Baby Portobello Mushroom Sauce:

2 T unsalted butter, divided
1 T olive oil
8 oz. baby portobello mushrooms, sliced
3 shallotts, sliced thin
1/2 cup red wine
1 can beef consomme
2 T balsamic vinegar
fresh rosemary sprig (optional-adds tons of flavor)
black pepper

In a large skillet over medium heat, melt 1 T butter and olive oil.  Add the portobello mushrooms and saute until tender, about 5 minutes.  Add the shallotts and cook for 2 minutes.  Stir in the red wine and let simmer until most of it is absorbed or evaporated, about 3 minutes.  Stir in the beef consomme and balsamic vinegar.  Throw in the whole rosemary sprig (will remove later). 


Turn heat to low and let simmer until sauce is reduced by half, pictured below.  If the sauce reduces too much and tastes too salty, add some water.  Remove the rosemary sprig.  Stir in the other 1 T butter.  Taste and season with black pepper.


After the steaks have rested,  plate up and top with mushrooms and drizzle with sauce.    Enjoy!


Linked up at:


Monday, January 24, 2011

Cinnamon Apple and Cranberry Oatmeal


I make brown sugar and cinnamon oatmeal quite often on the weekends.  My girls think it's a treat when I use the oatmeal out of the round container that takes a whole 5 minutes to cook.  School mornings are always so rushed that they get the packaged oatmeal from the microwave that only takes a minute. 

I have to admit that I was addicted to the packaged flavored oatmeal when I was pregnant with my Madison.  I would eat one every morning after I got to work.  My co-workers knew not to talk to me until after I had my oatmeal.  Pregnant women can be quite cranky in the mornings when hungry and tired.  That's when my love for oatmeal started, and now, my girls love it too.

Have you noticed my family likes cinnamon and apples together?  I decided to combine the flavors of the brown sugar and cinnamon oatmeal with cinnamon apples.  And I thew in some chewy dried cranberries for flavor, texture, and color.  My little Jordyn still does not like oatmeal, but I still get her to try a bite whenever I make it.  Lucky for me, I got to eat her bowl of Cinnamon Apple and Cranberry Oatmeal!  This recipe makes 3 servings.

Ingredients:

2 1/2 cups water
2 cups Quaker Old Fashioned Oats
2 apples, peeled, cored, and diced
3 T water
1/4 cup brown sugar
1-2 tsp cinnamon
dried cranberries
dash of milk

In a medium sauce pan, add water and bring to a boil.  Stir in the oats,and cook over medium high heat for 5 minutes, stirring occasionally.

In a small sauce pan over medium heat, add the diced apples, 3 T water, brown sugar, and cinnamon.  Cook until apples are tender, about 5-7 minutes.

When the oatmeal is cooked, pour in the sauce from the cinnamon apples and add a dash of milk to make it nice and creamy, and stir up it good.  Serve up in bowls, and top with the apples and cranberries.  Enjoy!


Sunday, January 23, 2011

Tex-Mex Chicken Chili


Tex-Mex is my favorite cuisine.  Well, that and Italian.  It's hard to choose, but this week, it's Tex-Mex.  I wanted to use the rest of a rotisserie chicken from the night before, and I usually use it in either some type of soup or casserole dish.  I would have liked to make some Chicken and Cheese EnchiladasChicken and Cheese Taquitos, or a simple Chicken Enchilada Casserole.  But I was a good girl and made a healthful Tex-Mex Chicken Chili with just a little shredded cheese on top.

This chili was really flavorful, especially with all the fresh toppings of pickled jalapenos, grape tomatoes, green onions, and shredded cheese.  My hubby even enjoyed it...yea, I got him to eat some chicken AND veggies.

Ingredients:

2 rotisserie chicken breasts, diced or shredded
1 T olive oil
1 yellow onion, chopped
3 cloves garlic, minced
kosher salt
black pepper
2 tsp chili powder
1 1/2 tsp cumin
1 1/2 tsp smoked paprika
1 tsp Mexican oregano
1 can petite diced tomatoes, drained
1 can diced green chilis, drained
1 can Cannellini beans, drained
1 can red kidney beans, drained
1-2 cans low sodium chicken broth, depending on how thick you want it

In a large soup pot over medium high heat, heat olive oil and saute onions with salt and pepper until translucent.  Add the garlic and cook another minute.  Add the spices, and let them toast for a minute while you stir.  Add the remaining ingredients, including the chicken.  Bring to a boil, lower heat, and simmer for 20 minutes, stirring occasionally.  Taste and adjust seasonings.

Top with your favorites and Enjoy:

pickled jalapenos
green onions
tomatoes
avocado
shredded cheese
tortilla strips


Thursday, January 20, 2011

French Apple Tarts by Little Chef Madison


Madison checked out two cookbooks from her school library this week.  One was for me and her Daddy...Bob Green's The Best Life Diet CookbookHow sweet of her to think of her poor starving parents struggling with this South Beach diet!

The other is Cooking 123 by Rozanne Gold.  This is an entire cookbook filled with 500 recipes containing only three ingredients.  Genius!  I told Madison to look through it and find something she wanted to make.  Of course, she went straight to the desserts section...a girl after my own heart!  She loves desserts with baked apples, so she chose the French Apple Tarts. 

We already had everything (all 3 ingredients) on hand, so she was excited to make them today after school.  I let her put off her studying until after our baking session so we would have plenty of sunlight for better photos.  I had fun documenting her.  She's so serious and focused in the kitchen.  And a little perfectionist too.

Madison's French Apple Tarts turned out beautifully and were really tasty.  I know that I'm on a diet, but if my little girl bakes something special for her family, I'm going to eat it.  I can't wait until she makes some more!  These are a great breakfast, snack, or dessert.  This recipe makes 6 tarts.

Ingredients:

1 sheet puff pastry
1-2 Granny smith apples (depending on size)
1/2 cup apricot jelly or jam

Preheat oven to 375 degrees.  Spray a non-stick baking sheet with cooking spray. 

Thaw puff pastry until pliable, but still very cold.  Cut the dough in half lengthwise, then across into thirds to get 6 rectangles.  Using the tines of a fork, prick a 1/4 inch wide border on each side of pastry.


Prick the center portion thoroughly with the fork. 


Place pastry on baking sheet.

Heat the apricot jelly with 1 T water in a small saucepan over low heat until melted.  Keep warm.

Peel, core, and seed apples.  Slice them into very thin wedges.  Arrange slices in an overlapping pattern on top of each pastry, leaving the borders clear. 


Brush the apple slices with melted jelly using a pastry brush.


Snack on the leftover apples.


Bake for 22-25 minutes, or until edges are golden brown and puffy.  Remove tarts from oven and brush apples and sides of pastry with melted jam...oops, we forgot to do this.  Garnish with powdered sugar.  Serve warm or at room temperature.  We heated them for 10 seconds in the microwave to enjoy after dinner.  Enjoy!


Wednesday, January 19, 2011

Banana Apple Cupcake Muffins


I wanted to make my girls a new sweet treat with bananas.  I have already made Moist Banana MuffinsBanana Blueberry Streusel Muffins, and Apple Cinnamon Spice Muffins.  I thought it would be great to combine the flavors of bananas and apples and add a vanilla icing/glaze on top.  I'm calling these cupcake muffins simply because they are more dense like a cupcake and have an icing (not frosting) on top.  These would be a great breakfast, snack, or dessert...you choose.   I also added some dried cranberries to a few of them.  Delicious! 

Ingredients:

1/2 cup butter (1 stick), softened
1/2 cup granulated sugar
1/4 cup brown sugar
2 eggs
1/4 cup vanilla yogurt
1/4 cup apple sauce
2 tsp vanilla extract
1 cup all-purpose flour
3/4 cup whole wheat flour
1 tsp baking soda
1/2 tsp salt
1 tsp cinnamon
3 bananas, mashed
1 Granny smith apple, peeled and diced small

Preheat oven to 350 degrees.  Line two cupcake/muffin tins with 17 paper liners.

In a large stand mixer, cream together the butter, granulated sugar, and brown sugar until light and fluffy.  Add the eggs, one at a time, and mix.  Add the yogurt, apple sauce, and vanilla extract, and mix until incorporated.  Sift in the all-purpose flour, whole wheat flour, baking soda, salt, and cinnamon.  Turn mixer on low and mix just until combined.  Remove the mixing bowl and fold in the mashed bananas and diced apples.  You can also stir in some golden raisins or dried cranberries.

Use an ice cream scoop to fill the cupcake liners almost full.  Bake for 20-22 minutes, or until toothpick comes out almost clean.  Let cool in the pan for 5 minutes.  Remove to a wire rack to cool completely before icing.  

Vanilla Icing/Glaze

1 cup powdered sugar
1 tsp vanilla extract
1 T plus 1 Tsp milk

Mix all ingredients in a small bowl.  Pour into a plastic sandwich bag, cut a small hole in the corner, and drizzle over the cooled cupcakes.  Enjoy!


Linked up at:

Tuesday, January 18, 2011

Chewy Fudgy Double Chocolate Brownies


We were having some friends over Sunday to grill fajitas and watch football with us.  They were bringing the fajita meat, guacamole, and rice.  I was making the salsa, charro beans, and dessert.  Their son's favorite dessert is brownies, and my girls love brownies, so I set out to find a simple yet delicious brownie recipe.  I didn't have to look far as I already have several saved to try from Brown Eyed Baker.  I chose to make the Triple-Chocolate Brownies, but adapted it slightly by using only two kinds of chocolate.  The original recipe is from Baker's Illustrated cookbook. 

Ingredients:

7 oz. semi-sweet baking chocolate, chopped
8 oz (1 stick) unsalted butter, cut into quarters
3 T unsweetened cocoa powder
3 large eggs
1 1/4 cups granulated sugar
2 tsp vanilla extract
1/2 tsp salt
1 cup all-purpose flour

Preheat oven to 350 degrees.  Spray an 8-inch square baking pan with non-stick cooking spray.  Line it with 2 pieces of parchment paper, leaving an overhang on all sides.  This will help you remove them from the pan before cutting into bars.

In a heat proof bowl, add the semi-sweet chocolate and butter.  Microwave for 1 minute.  Remove and stir.  Microwave in 15 second intervals until completely melted.  Whisk in the cocoa powder until smooth.  Set aside to cool.

In a large bowl, whisk together the eggs, sugar, vanilla extract, and salt until well combined.  Slowly pour in the melted chocolate, whisking constantly.  Sift in the flour and stir with a wooden spoon just until combined.  Pour brownie mixture into prepared pan and tap on the counter to release any bubbles and level.  Bake for 32-38 minutes, or until toothpick comes out with a small amount of sticky crumbs.  Cool on a wire rack in the pan.  Lift brownies out of the pan using the parchment paper, and cut into squares.  Dust with powdered sugar.  Enjoy!


Update...
I made these for our Super Bowl party too!  I used a large round cookie cutter, then used a knife to make two football shaped brownies.  I know that a football has 8 stitches, but I fit as many as possible. They still look cute!


Monday, January 17, 2011

Chocolate Peanut Butter Swirl Mini Cheesecakes


My hubby arrived home from work last night with 4 boxes of Girl Scout cookies.  Talk about testing my willpower and strength!  I have a serious weakness for chocolate and peanut butter, but decided to turn that weakness into creativity.


I had already planned to make my girls some chocolate cheesecake bars this weekend.  I knew I could do better, so I came up with these little cheesecakes.  I decided to add some peanut butter into the equation, and make them individual servings that can be eaten without a fork.  The bottom crust is a Girl Scout Peanut Butter Patty.


Rich chocolate cheesecake filling is on top of the cookie crust, and creamy peanut butter is swirled on top.  Then they are baked and cooled.  To make them look pretty and taste even more decadent, they are drizzled with melted chocolate and garnished with another piece of Peanut Butter Patty.

These little cheesecakes are a force to be reckoned with.  I did cheat just a little on my diet...I had to taste the other half of the one pictured so you could see the inside.  I also had to make sure it tasted good before posting the recipe.  My girls thought these were the best!  You might want to double the recipe as this only makes 10 muffin size cheesecakes, and they could be extremely addictive.  I'm still dreaming of eating my other half...

Ingredients:

10 Peanut Butter Patties, whole
8 oz cream cheese, room temperature ( I used 1/3 less fat)
1/4 cup granulated sugar
1/2 tsp vanilla extract
3 oz semi-sweet chocolate baking squares (3 squares), melted and cooled
1 egg
1/2 cup creamy peanut butter (I used Jif reduced fat)

Garnish:
Melted semi-sweet chocolate
4 Peanut Butter Patties, quartered (you will have 2 quarters left over to snack on!)

Preheat oven to 325 degrees.  Line a regular size cupcake/muffin tin with paper liners.  Place a Peanut Butter Patty in the bottom of each liner. 

In a large stand mixer, beat together the cream cheese, sugar, and vanilla extract until sugar is smooth.  Melt the chocolate and let cool for a few minutes.  Turn the mixer on low and slowly add in the melted chocolate.  Add the egg and mix just until blended.  Use an ice cream scoop to fill each cookie coated liner 2/3 full.  

Microwave the peanut butter for 20 seconds and stir.  Place about a teaspoon of peanut butter in the middle of each chocolate cheesecake and use a toothpick to swirl.  Bake for 18-20 minutes, or just until set around the edges.  Remove from the oven and let cool in the pan to room temperature.  Refrigerate for 4 hours.  

When ready to eat, drizzle some melted chocolate over top and garnish with a quartered Peanut Butter Patty cookie.  Enjoy! 

Linked up at Tailgating Time at The Tiny Skillet

Sunday, January 16, 2011

Chicken Enchilada Soup


I was craving some Tex-Mex last night, but Chicken and Cheese Enchiladas are not on my diet.  So I created this thick and hearty soup and topped it with just a sprinkle of reduced fat shredded cheese.  Try it, I know you will like it!

Ingredients:

2 Rotisserie chicken breasts, diced or shredded
2 tsp olive oil
1/2 yellow onion, chopped
kosher salt
black pepper
3 cloves garlic, minced
1 can mild Rotel tomatoes, with juice
1 can smoked green chilis, drained
1 can low sodium chicken broth
1 can reduced sodium pinto beans, drained
1 can enchilada sauce
1 tsp cumin
1 tsp smoked paprika
1 tsp dried Mexican oregano

In a large soup pot over medium heat, add the olive oil, onions, kosher salt, and pepper.  Cook onions until tender, about 7 minutes.  Add the garlic and cook another minute.  Add the chicken, Rotel tomatoes with juice, green chilis, chicken broth, pinto beans, enchilada sauce, cumin, smoked paprika, and Mexican oregano.  Bring to a boil, lower heat, and simmer for 20 minutes.  Top with reduced fat shredded cheese and chopped scallions.  (The sour cream topping was not good in this soup, but looks pretty in my dark night time pictures)  Enjoy!  

Saturday, January 15, 2011

Ham and Veggie Quiche Cups


These crustless quiche cups have been around forever, or at least since the low carb craze!  You can add whatever meats and veggies you have in the fridge.  I used my favorites, and as always, topped mine with salsa.  This recipe makes 8-9 regular muffin size quiche cups, depending on how many fillings you add.

Ingredients:

6 extra large eggs
1/4 cup skim milk
kosher salt, to taste
black pepper, to taste
dash of garlic powder
1/2 tsp Italian seasoning
1/4 cup reduced fat finely shredded colby/jack cheese
1 tsp olive oil
1/4 cup cooked ham, diced
2 T red bell pepper, chopped
2 T green bell pepper, chopped
2 green onions, chopped
6 button mushrooms, chopped

Preheat oven to 350 degrees.  Generously spray muffin tin with non-stick cooking spray.

In a large bowl, beat together the eggs and milk.  Add the kosher salt, black pepper, garlic powder, Italian seasoning, and shredded cheese.  Mix together and set aside.

In a skillet over medium heat, add 1 tsp olive oil.  Add the ham and all the chopped veggies, and saute for 4 minutes.  Remove from heat and let cool slightly.

Stir the ham and veggie mixture into the beaten eggs.  Use a small ladle or measuring cup to scoop the egg and veggie mixture into the prepared muffin tin, about 2/3 full. 
Note:  The eggs will puff up while baking, but will fall slightly when cooling.

Bake for 15 minutes, or until toothpick comes out clean.  Run a knife around the edges of each quiche to help it release.  Let cool in pan for a few minutes.  Garnish with fresh chopped tomatoes and scallions.  Enjoy! 

Related Posts with Thumbnails